
Side Dishes
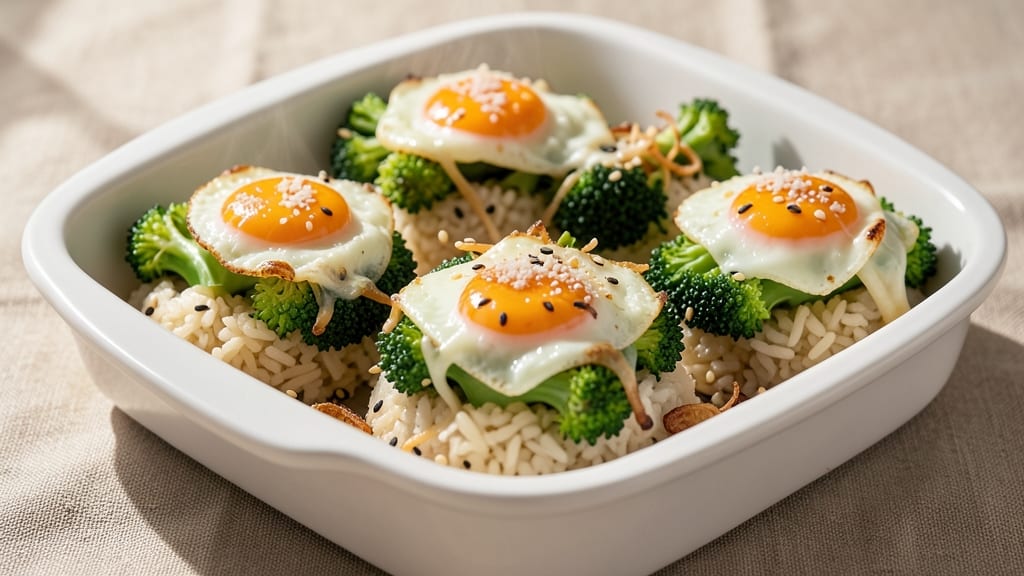
This broccoli rice cups recipe delivers crispy-topped, handheld bites that work as snacks or light meals—perfect for meal prep or parties. The secret lies in baking until golden, creating that satisfying crunch while keeping the inside tender.
I’ve tested countless variations, and this method ensures every cup stays structurally sound without getting soggy.
What makes these cups special is their versatility: they’re naturally vegetarian but easily elevated with protein like shredded chicken or smoked salmon. The crispy cheese topping isn’t just for flavor—it’s the game-changer that keeps them from falling apart.
Ready in under 30 minutes with minimal active time, these cups are ideal for busy weeknights or entertaining.
Ingredients for broccoli rice cups
Crispy cheese topping meets tender broccoli-rice filling—handheld bites that deliver restaurant-style flavor with minimal effort.
| Ingredient | Amount | Notes |
|---|---|---|
| Rice, Uncooked (White or Jasmine) 🍚 | 1 cup | Long-grain preferred for texture |
| Fresh Broccoli Florets 🥦 | 2 cups | Finely chopped, stems included |
| Shredded Mozzarella Cheese 🧀 | 1 ½ cups | Part-skim or whole milk preferred |
| Large Eggs 🥚 | 2 whole | Beaten for binding mixture |
| All-Purpose Flour 🌾 | ¼ cup | For crispy topping texture |
| Parmesan Cheese 🧀 | ½ cup | Freshly grated, for flavor depth |
| Garlic Powder 🧄 | 1 tsp | For aromatic base flavor |
| Onion Powder 🧅 | 1 tsp | Complements garlic flavor |
| Ground Black Pepper 🌶️ | ½ tsp | Freshly ground preferred |
| Olive Oil 🫒 | 1 tbsp | For greasing muffin tin |
| Vegetable Broth 💧 | ½ cup | Low-sodium preferred |
| Salt 🧂 | 1 tsp | Kosher or sea salt preferred |
| Panko Breadcrumbs 🍞 | ¼ cup | For extra crunch topping |
The cheese topping is non-negotiable for that signature crisp. Whole-milk mozzarella melts best, but part-skim works in a pinch. Whole Foods or Trader Joe's carry pre-shredded options, but freshly grated always wins. For the rice, jasmine has a slightly floral note that pairs beautifully with broccoli, but long-grain white works perfectly fine. The broccoli stems add great texture—don't peel them. Costco, but any fresh florets will do. Look for vibrant green color and firm stems.
No panko? Regular breadcrumbs toasted in the oven for 5 minutes work just as well. Short on mozzarella? Parmesan mixed with mozzarella gives you that extra umami punch. The vegetable broth can be swapped for chicken broth if you're not strictly vegetarian, but keep it low-sodium. For extra protein, fold in cooked quinoa or chickpeas to the rice mixture. The eggs are crucial for binding—don't skip them unless you're using a flax egg substitute (1 tbsp ground flax + 3 tbsp water per egg). The garlic and onion powders can be replaced with fresh minced garlic and onion if you prefer.
Prep ahead by mixing all ingredients except the cheese topping the night before. Store in an airtight container in the fridge for up to 24 hours—the flavors meld beautifully. For the crispy topping, assemble and bake immediately before serving. These cups reheat surprisingly well—30 seconds in the microwave restores that crispy texture. Portion into mini muffin tins for perfect bite-sized appetizers. Leftovers keep for 3 days in the fridge, but they're so good they rarely last that long.
Why You'll Love This Recipe
- I use what I’ve got: jasmine rice when I’m feeling fancy, day-old breadcrumbs if I’m out of flour, whatever cheese is on sale. It’s the kind of recipe that stretches a grocery budget without tasting cheap. Plus, the leftovers? They disappear faster than I can say “third helping.”
- No Fuss, Big Payoff: I swear by this recipe on nights when I’m too tired to measure—just mix the rice, flour, and egg into a batter, fold in broccoli florets, and bake. The cups puff up like magic, and honestly? Even if they’re not perfectly round, no one cares when they’re this good.
- Cheesy Crispy Magic: That moment when the mozzarella turns golden and the edges get crispy? It’s the best part. The broccoli stays bright green inside, and the whole thing has this weirdly addictive texture—like a cross between a fritter and a mini lasagna. (Yes, even my picky husband asks for seconds.)
- Lunchbox Hero: Between us, these are my go-to for packed lunches or last-minute dinner guests. They reheat beautifully (microwave or oven, no judgment), and I can make a whole batch ahead—freezer-friendly too. Throw in a side salad, and suddenly you’ve got a meal that feels fancy but took 10 minutes.
Step-by-step instructions for broccoli rice cups
Master the technique for perfectly crispy tops and tender centers in these handheld bites.
Prepare the Rice Mixture
In a medium saucepan, combine the 1 cup uncooked rice with the 0.5 cup vegetable broth and bring to a boil over medium-high heat. Once boiling, immediately reduce heat to low, cover with a tight-fitting lid, and simmer for 15 minutes. You'll know it's ready when all the liquid has been absorbed and the rice is tender but still slightly firm.
Remove from heat and let it cool for 5 minutes. While it cools, stir in the 1 tsp garlic powder, 1 tsp onion powder, 0.5 tsp ground black pepper, and 1 tsp salt. This seasoning blend will infuse the rice with savory depth. I like to use a fork to gently break up any large clumps, ensuring an even texture throughout the mixture. The rice should be cool enough to handle when you're ready to mix with the broccoli.
Combine Broccoli and Cheese
In a large mixing bowl, combine the 2 cups fresh broccoli florets with the cooled rice mixture. Use your hands to gently fold everything together until the broccoli is evenly distributed. The broccoli should be finely chopped as specified in the ingredients list, so it blends seamlessly with the rice.
Next, fold in the 1.5 cups shredded mozzarella cheese and 0.5 cup freshly grated Parmesan cheese. I recommend using your hands for this step—it helps distribute the cheese evenly and creates a smooth, cohesive mixture. The cheeses will begin to soften slightly from the warm rice, which helps bind everything together. At this stage, the mixture should be thick but still moldable, like wet sand. If it feels too dry, add 1 teaspoon of vegetable broth at a time until it reaches the right consistency.
Prepare the Binding Mixture
In a separate bowl, beat the 2 whole large eggs until just combined. Add the 0.25 cup all-purpose flour and mix until smooth. This creates a simple batter that will help bind the rice mixture when combined. The eggs act as a glue, while the flour adds structure to the crispy topping.
Pour the egg mixture over the rice-broccoli-cheese mixture in the large bowl and gently fold everything together using a rubber spatula. Be careful not to overmix—just combine until all ingredients are evenly distributed. The mixture should be thick and cohesive, holding together when pressed between your fingers. If it feels too loose, add 1 tablespoon of all-purpose flour at a time until it reaches the right consistency. This step is crucial for preventing the cups from falling apart during baking.
Assemble and Bake the Rice Cups
Preheat your oven to 375°F. Lightly grease a standard 12-cup muffin tin with 1 tablespoon olive oil, making sure to coat each cup thoroughly. This prevents sticking and ensures easy removal after baking. Divide the rice mixture evenly among the muffin cups, pressing down gently to fill each cup about ¾ full. The mixture should mound slightly above the rim of the tin.
In a small bowl, combine the 0.25 cup Panko breadcrumbs with 1 tablespoon grated Parmesan cheese for extra flavor. Sprinkle this mixture evenly over each rice cup, pressing down lightly with your finger to help it adhere. This topping will create the crispy crust that makes these cups so satisfying. Bake for 20-25 minutes until the edges are golden brown and the centers feel firm when pressed gently with a toothpick. The tops should be crispy, while the centers remain tender and slightly chewy.
Cool and Serve
Remove the muffin tin from the oven and let the rice cups cool in the tin for 5 minutes. This brief resting period allows the centers to set slightly, making them easier to handle. Use a small offset spatula to gently loosen the edges of each cup, then invert them onto a wire rack or plate. The crispy topping will help them maintain their shape as they cool completely.
Serve the broccoli rice cups warm or at room temperature. They're perfect for snacking, appetizers, or even as a light meal when paired with a simple salad or marinara sauce. The contrast between the crispy exterior and tender, cheesy interior makes each bite satisfying. Store any leftovers in an airtight container in the refrigerator for up to 3 days, reheating in the oven at 350°F for 5-7 minutes to restore crispiness.
Pro Tips For Making Broccoli Rice Cups
- STEAM THE BROCCOLI FIRST: I learned this the hard way—raw broccoli florets in the cups make the rice soggy and the egg watery. Steam them for 3-4 minutes until bright green but still crisp, then drain well before mixing. This keeps the texture right and prevents a sad, mushy center.
- USE DAY-OLD RICE: Freshly cooked rice is too damp and will turn your cups into a gluey mess. Make your rice a day ahead, spread it on a tray to cool completely, then fluff it up before mixing with the other ingredients. The starchy grains will absorb better, and your cups will hold their shape.
- DON’T OVERMIX THE BATTER: Once you fold in the egg and flour, stop stirring the second everything looks just combined. Overworking the batter makes the cups dense and tough—think of it like scrambling eggs. A few streaks of white are fine; the heat will even things out in the oven.
- SALT THE EGG WASH: Before baking, brush the tops of your cups with a beaten egg mixed with ½ teaspoon salt per egg. The salt crisps the edges faster and deeper than plain egg, giving you that golden, restaurant-style finish without watching the oven like a hawk. (Yes, even if you’re impatient like me.)
Storing and reheating this broccoli rice cups
Fridge Storage Tips
Store your broccoli rice cups in an airtight container with parchment paper between layers to prevent sticking. They keep fresh in the fridge for up to 3 days—the crispy topping stays intact when properly sealed. I always use glass containers with snap-on lids for easy reheating. 🧂
Let the cups cool completely before storing to avoid condensation buildup, which can make the topping soggy. Arrange them in a single layer to maintain their shape. If stacking, place a sheet of parchment between layers for extra protection.
Freezer-Friendly Trick
For longer storage, freeze the cups for up to 1 month. Bake them as directed, then let cool completely before transferring to a freezer-safe bag with all air squeezed out. Label with the date—thaw overnight in the fridge before reheating. 🥶
To reheat from frozen, place the cups directly on a baking sheet and warm in a 350°F oven for 10-12 minutes until heated through. The oven method restores crispiness better than the microwave.
Microwave Revival
For quick reheating, cover the cups with a damp paper towel and microwave on medium power for 20-30 seconds. This method works best for single servings and helps maintain some crispiness. Add a splash of water to the paper towel if needed. ⚡
If the cups lose their crunch, pop them back in the oven for 3-5 minutes at 375°F to restore texture. The microwave should only be a last-resort option for speed.
Oven Refresh Method
My favorite way to revive stale cups is by broiling them for 2-3 minutes at 400°F. Place them on a baking sheet lined with parchment paper and watch the cheese topping crisp up again. This method works even on fully cooled cups. 🔥
For extra flavor, sprinkle a pinch of garlic powder or Parmesan cheese before broiling. The high heat quickly revives the texture without overcooking the interior.
Nutrition facts
Frequently asked questions
Can I make these cups without eggs for a vegan version?
Yes! Replace the 2 eggs with a flax egg substitute (1 tbsp ground flaxseed + 3 tbsp water per egg) or use 1/4 cup aquafaba (chickpea brine) beaten until frothy. Add 1 tbsp nutritional yeast for extra binding power. The texture will be slightly denser but still hold together when baked.
Why did my broccoli rice cups fall apart when baking? This usually happens when the mixture isn't properly bound or baked too long.
What's the best way to add protein to these cups?
For vegetarian options, mix in 1/2 cup cooked quinoa or 1/2 cup black beans with the rice. For pescatarian versions, fold in 1/2 cup cooked shrimp or 1/2 cup smoked salmon. Keep the protein finely chopped so it blends well. The egg binder will still work perfectly with these additions.
Can I use cauliflower rice instead of regular rice?
Cauliflower rice works wonderfully and makes these cups even lower-carb. Use 2 cups riced cauliflower (about 1 small head) and reduce the broth to 1/4 cup. The texture will be slightly lighter, but the crispy cheese topping will still hold everything together beautifully.
How do I make these cups gluten-free?
Replace the all-purpose flour with 1/4 cup gluten-free flour blend and the Panko breadcrumbs with 1/4 cup gluten-free panko or crushed gluten-free cornflakes. Also use tamari instead of soy sauce if you're using it in any variations. The binding will still work perfectly with these substitutions.