
Desserts
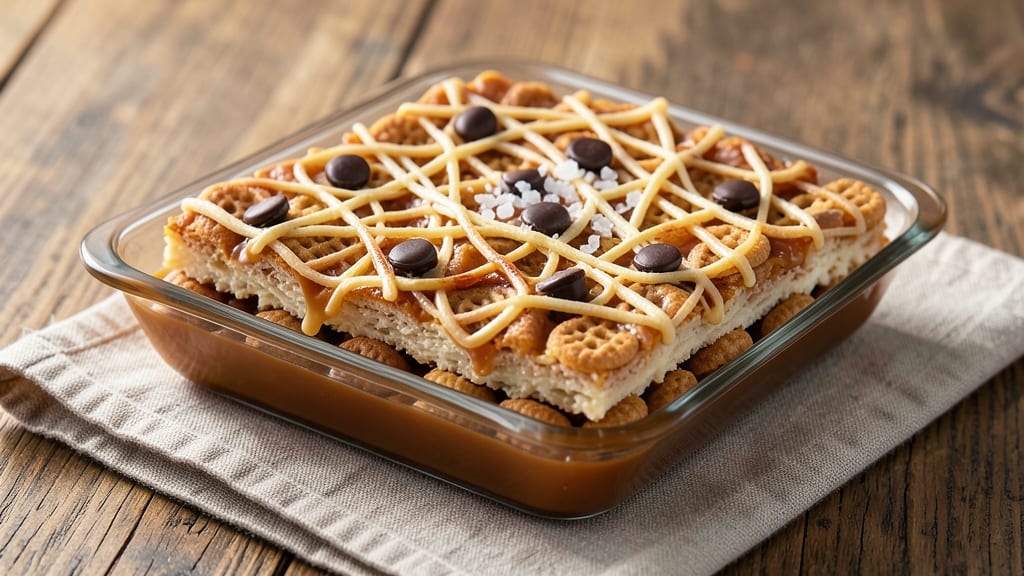
This Cheerio Rice Krispie recipe transforms a childhood classic into a nostalgic, melt-in-your-mouth treat with a grown-up twist. The secret lies in balancing crispy Cheerios with perfectly gooey marshmallows, creating clusters that dissolve on the tongue.
I’ve perfected this version to stay firm enough to cut but still irresistibly soft—no more crumbly mess or overly sticky batches.
What makes this recipe stand out is the foolproof technique for melting marshmallows evenly and mixing in the cereal without overworking it. Whether you’re baking for a crowd or craving a quick dessert, these treats deliver that perfect balance of crunch and creaminess.
Plus, optional add-ins like chocolate chips or white chocolate drizzle let you customize them to your taste.
Ingredients for cheerio rice krispie
Eight ingredients, two optional add-ins—this nostalgic treat gets a grown-up crunch and melt.
| Ingredient | Amount | Notes |
|---|---|---|
| Cheerios Cereal 🥣 | 8 cups | Original flavor, lightly crushed |
| Large Marshmallows 🧸 | 40 whole | Extra-large size preferred |
| Unsalted Butter 🧈 | 1 cup | Cold, cut into small cubes |
| Vanilla Extract 🌿 | 1 tsp | Pure, high-quality preferred |
| Sea Salt 🧂 | ½ tsp | Fine grain, for sprinkling |
| Dark Chocolate Chips 🍫 | 1 cup | Optional, semi-sweet variety |
| White Chocolate Chips 🍫 | ½ cup | Optional, for drizzle |
| Powdered Sugar 🍚 | 1 tbsp | Optional, for dusting |
The Cheerios make all the difference here—original flavor is non-negotiable for that classic taste. Trader Joe's and Target usually carry them in bulk, and you'll want about 8 cups total. Lightly crush them in a bag with a rolling pin for that perfect cluster texture. Marshmallows? Extra-large (like those giant marshmallows) melt slower and create those dreamy pockets of gooeyness. If you can't find them, regular large marshmallows work, but you might need to adjust the butter slightly—too much butter makes them sticky, too little leaves them dry.
Butter matters—unsalted and cold is key. If you grab salted, reduce the sea salt to 1/4 tsp. No vanilla? Almond extract at half the amount works, but it's not the same. Chocolate chips are totally optional, but if you add them, toss them in right after the marshmallows melt—otherwise, they'll sink to the bottom. White chocolate drizzle? Melt it separately and pour over the top after cutting. No white chocolate? Melted peanut butter gives a totally different (but still delicious) vibe. And if you're feeling fancy, swap the powdered sugar for a sprinkle of crushed peppermint candy.
This keeps beautifully—3-4 days in an airtight container at room temperature, or 2 weeks in the fridge if you want to extend it. For parties, I always make two batches and cut them into fun shapes with cookie cutters. The treats firm up as they cool, so don't rush cutting them. If they're too soft, pop them back in the fridge for 20 minutes. Pro tip: Line your pan with parchment paper—trust me, it makes cleanup a breeze.
Why You'll Love This Recipe
- Pantry Magic: I swear, this recipe lives in my pantry—no shopping list, no stress. You’ve got Cheerios, marshmallows, butter, and a splash of vanilla? Boom. The only prep is melting butter in a pot, and honestly, it’s harder to burn toast than this is to make.
- Buttery Vanilla Crunch: That first bite? Crunchy Cheerios hugging gooey marshmallows, all wrapped in rich butter and vanilla—it’s like dessert sneaked into breakfast. The sea salt finish? Chef’s kiss. Simple, but it’s the kind of flavor that makes you pause mid-bite.
- Snack or Dessert: Need a quick lunchbox treat? A last-minute dessert? This does both. Pack it in jars for kids’ lunches or serve it warm for a cozy after-dinner bite. (Yes, even on a Tuesday night when you’re too tired to think.)
- Zero-Waste Leftovers: Make a big batch—it keeps for days in the fridge, and the leftovers? Just as good cold as warm. My kids ask for it more than store-bought treats, and I’m not even trying to impress anyone with fancy plating. Just pure, happy eating.
Step-by-step instructions for Cheerio Rice Krispie treats
Here's how to transform simple pantry staples into irresistible Cheerio Rice Krispie treats with perfect texture and flavor.
Melt Butter and Add Vanilla
In a large, heavy-bottomed saucepan, melt the 1 cup unsalted butter over medium-low heat. I use a saucepan with low sides to make stirring easier—this prevents butter from splattering. Let it melt completely, then reduce heat to low to maintain a gentle simmer.
Once fully melted, remove the pan from heat and stir in the 1 teaspoon vanilla extract and ½ teaspoon sea salt. The salt enhances all the flavors, so don't skip this step. Let the mixture sit off the heat for 2 minutes—this prevents the marshmallows from burning when we add them later. Watch for any butter foam to settle before proceeding.
Cook the Marshmallows to Golden Perfection
Return the pan to low heat and add all 40 whole large marshmallows at once. Stir gently but constantly with a wooden spoon—this prevents sticking and ensures even melting. You'll want the marshmallows to melt completely and form a smooth, golden caramel that coats the back of your spoon.
Here's the thing—this step requires patience. If the mixture starts to brown too quickly, reduce heat to lowest setting or remove from heat entirely for 30 seconds before continuing. You're aiming for a glossy, syrupy consistency that's thick enough to coat a spoon but still pourable. This usually takes 5-7 minutes of careful stirring.
Fold in Cheerios and Chocolate
Immediately after removing from heat, add the 8 cups Cheerios cereal and stir vigorously with a wooden spoon. The cereal will absorb the marshmallow mixture quickly, so work fast. You'll notice the mixture becomes thick and crumbly—this is normal. Then fold in the 1 cup dark chocolate chips and ½ cup white chocolate chips using your hands or a spatula.
Here's where the magic happens: the chocolate chips will melt slightly from the residual heat, creating pockets of gooey chocolate throughout. If the mixture feels too dry, add 1-2 teaspoons of milk (not in the ingredients list, but you'll have it nearby) to help bind everything together. The treats should hold together when pressed gently in your hand, but still be workable.
Press into Pan and Cut
Lightly grease a 9x13-inch baking dish with butter or line it with parchment paper. Transfer the Cheerio mixture to the prepared pan and press down firmly and evenly using a greased spatula or your hands. I like to press in a back-and-forth motion to create those classic Rice Krispie treat ridges. The mixture should be compact but not overly dense—you want visible Cheerio clusters throughout.
Smooth the top with the spatula and let the treats cool completely in the pan for 1-2 hours at room temperature. This cooling time is crucial—it allows the mixture to set properly so you get clean slices. If you're impatient, chill in the refrigerator for 30-45 minutes, but don't skip the cooling entirely or the treats will crumble when cutting.
Dust and Slice for Serving
Once completely cooled, dust the top with the 1 tablespoon powdered sugar using a fine-mesh sieve. This adds a beautiful finishing touch and balances the sweetness. Let the sugar settle for 1 minute, then carefully lift the treats from the pan using the parchment paper if you used it.
Slice into 16 squares (about 2x2 inches each) using a sharp knife dipped in hot water and wiped dry between cuts. This prevents the treats from sticking and gives you clean edges. Serve immediately or store in an airtight container at room temperature for up to 5 days, though they rarely last that long in my house!
Pro Tips For Making Cheerio Rice Krispie
- Use Medium Heat for Butter: I learned this the hard way—melt the butter on medium heat (not simmering or high). If it gets too hot, the marshmallows will turn grainy before they even melt, and you’ll end up with a sad, clumpy mess instead of that creamy, golden goodness.
- Toast Cheerios First: Skip the raw cereal—lightly toast the Cheerios in a dry pan for 2-3 minutes until they’re just slightly puffed and smell nutty. This adds depth of flavor and prevents them from turning mushy when the marshmallow mixture hits.
- Cut Marshmallows in Half: Large marshmallows take forever to melt properly. Slash them lengthwise with a knife before adding them to the pot—this speeds up melting and ensures a smoother, more even texture. (Yes, even if you’re impatient like me.)
- Salt the Butter, Not the Marshmallows: Add the sea salt directly to the melted butter (about ¼ teaspoon) before mixing in the marshmallows. Sprinkling it later means uneven distribution, and you’ll end up with pockets of blandness where the cereal sits.
Make-ahead tips for this dish
Prep Ahead Strategy
Make the marshmallow-butter mixture up to 2 days in advance and store it in a sealed container in the fridge. When ready to assemble, simply reheat the mixture in the microwave for 30-45 seconds until smooth, then fold in the Cheerios and chocolate.
This saves time and ensures you're always starting with perfectly melted marshmallows. 💡
Freezer-Friendly Assembly
Press the fully assembled treats into a 9x13-inch pan and freeze for 1 hour before slicing. The cold temperature makes cutting easier and prevents crumbling. Store the frozen treats in an airtight container with parchment paper between layers.
When ready to serve, let them sit at room temperature for 10-15 minutes to soften slightly. This method keeps them fresh for up to 3 months! ❄️
Batch Cooking Tips
Double the recipe and divide it between two 9x13-inch pans for larger gatherings. Use a cookie scoop or ice cream scoop to portion the mixture evenly before pressing.
This ensures consistent thickness and makes slicing a breeze. I like to label each pan with the date and store them separately in the fridge. 📅
Make-Ahead Serving
Cut the treats into squares and store them in a single layer on a baking sheet lined with parchment paper. Freeze for 1 hour, then transfer to an airtight container with layers separated by parchment.
This prevents sticking and makes grabbing individual treats effortless. They'll stay fresh for 2 weeks in the freezer and can be served straight from frozen. Perfect for last-minute parties! 🎉
Reheating Leftovers
If your treats soften too much, pop them back in the fridge for 30 minutes to firm up. For a quick reheat, place individual squares on a microwave-safe plate and heat for 5-10 seconds at 50% power to restore that melty marshmallow texture.
Avoid over-heating—they should just warm through, not become sticky again. 🔥
Gift-Worthy Packaging
For a thoughtful gift, wrap individual treats in cellophane bags tied with twine or ribbon. Place them in a decorative box or tin for a professional touch. I add a sprinkle of powdered sugar or a drizzle of melted white chocolate right before packaging to keep them looking fresh.
These make amazing hostess gifts and always disappear quickly! ✨
Nutrition facts
Frequently asked questions
Why do my Cheerio Rice Krispie treats turn out crumbly?
The most common cause is overworking the cereal mixture or not cooling properly. Once you fold in the Cheerios, work quickly—overmixing makes them dry and crumbly. Also, never cut them until fully cooled (1-2 hours at room temp). If they're still too soft, chill for 30 minutes before slicing.
Can I use a different cereal instead of Cheerios?
Yes, but the texture changes! For a similar crunch, try corn flakes or Rice Krispies (the original). If you use puffed rice cereal, the treats will be lighter but less crispy. For extra flavor, add 1 teaspoon cinnamon or ½ teaspoon almond extract to the marshmallow mixture.
How do I prevent the marshmallows from burning?
Low and slow is key! Keep heat at lowest setting and stir constantly with a wooden spoon. If the mixture starts browning too fast, remove from heat for 30 seconds to cool slightly. A heavy-bottomed saucepan helps distribute heat evenly. The marshmallows should melt into a glossy, golden syrup—not dark brown.
Can I make these treats gluten-free?
Use gluten-free Cheerios (like General Mills GF version) and check your marshmallows for gluten-free certification. Most store-bought marshmallows are gluten-free, but always verify labels. The recipe stays the same—just ensure all ingredients meet your dietary needs.
What’s the best way to store leftovers?
Keep them in an airtight container at room temperature for 3-4 days, or refrigerate for 2 weeks if you want them to last longer. For freezing, wrap individually in plastic wrap and store for up to 3 months. Let them sit at room temp for 10 minutes before serving to restore the melty texture.