
Main Courses
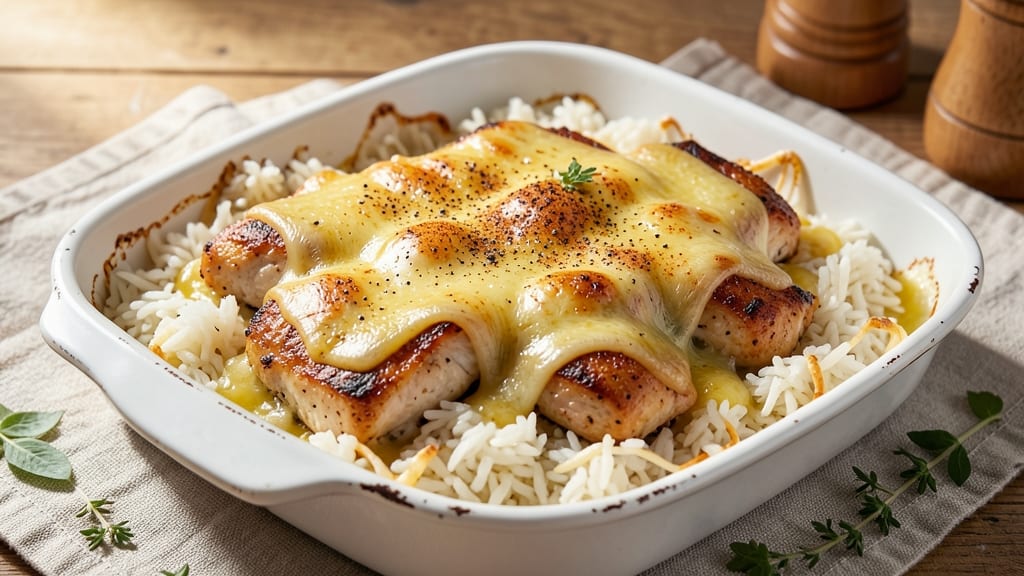
This cheesy chicken baked rice recipe delivers the perfect balance of crispy golden crust and melty cheese pockets in every bite. The secret lies in layering tender chicken, perfectly seasoned rice, and a rich cheese topping that transforms into a bubbly, caramelized finish.
I've refined this dish over years, ensuring it's foolproof for weeknight dinners while still feeling like a restaurant-worthy meal.
What sets this recipe apart is the combination of sautéed chicken thighs (juicier than breasts) and a creamy cheese sauce that coats the rice without turning it soggy.
The baking process creates a crispy top layer while keeping the rice tender underneath, and the cheese pulls into perfect strings when served. Ready in just 45 minutes, this dish satisfies cravings without requiring advanced techniques—just a few simple steps and patience for the oven to work its magic.
Ingredients for cheesy chicken baked rice
Juicy chicken thighs, perfectly seasoned rice, and a golden cheese crust—here's what makes this dish shine.
| Ingredient | Amount | Notes |
|---|---|---|
| Boneless, Skinless Chicken Thighs 🍗 | 1 ½ lb | Cut into bite-sized pieces |
| Long-Grain White Rice 🍚 | 2 cups | Uncooked, rinsed thoroughly |
| Chicken Broth 💧 | 2 cups | Low-sodium preferred |
| Shredded Cheddar Cheese 🧀 | 2 cups | Sharp or medium cheddar |
| Mozzarella Cheese 🧀 | 1 cup | Shredded, low-moisture preferred |
| Butter 🧈 | ½ cup | Unsalted, melted |
| All-Purpose Flour 🌾 | ¼ cup | For crispy topping |
| Garlic Cloves 🧄 | 4 cloves | Minced for flavor base |
| Yellow Onion 🧅 | 1 whole | Diced, medium size |
| Olive Oil 🫒 | 2 tbsp | For sautéing chicken |
| Salt 🧂 | 1 ½ tsp | Kosher or sea salt |
| Black Pepper 🌶️ | ½ tsp | Freshly ground |
| Dried Parsley 🌿 | 1 tbsp | For garnish, optional |
The chicken thighs are key—bone-in, skin-on stays juicier than breasts. Trader Joe's or Costco often have them pre-cut, saving time. Look for thighs with good marbling for extra flavor. For the rice, I always use long-grain white—it stays firm after baking. The cheese matters too: sharp cheddar adds tang, while low-moisture mozzarella prevents sogginess. If you can't find low-moisture, pat shredded cheese with a paper towel to remove excess moisture.
No sharp cheddar? Monterey Jack or pepper jack works in a pinch. Short on mozzarella? Parmesan at half the amount adds umami depth. The flour topping can be swapped for panko breadcrumbs for extra crunch. For extra richness, stir a splash of milk into the cheese sauce before baking. The chicken broth can be subbed with vegetable broth for a vegetarian version, though the flavor will differ slightly. Fresh parsley isn't mandatory—dried oregano at one-third the amount works if you're out.
This dish reheats beautifully—just cover with foil and warm in the oven for 10-15 minutes. The cheese topping gets crispier the second time around. Store leftovers in the fridge for up to 4 days, though I rarely have any left. For meal prep, bake an extra dish and freeze portions—3 months in the freezer with no texture loss. The rice stays firm when reheated from frozen, but add a splash of broth when warming.
Why You'll Love This Recipe
- One-Pan Magic: I swear by this recipe because it’s literally one pan—no chopping boards, no extra bowls, just dump and bake. The chicken thighs stay juicy while the rice soaks up that rich broth, and the cheeses melt into a golden blanket on top. My lazy Sundays thank me every time.
- Melty Perfection: Between us, the combo of sharp cheddar and stretchy mozzarella is chef’s kiss—that crispy top hides gooey pockets of cheese that’ll make you groan with every bite. The chicken broth adds depth, so it’s never just "cheesy rice," but something that tastes like a hug in a casserole dish.
- Lunchbox Hero: This is my go-to for meal prep because it reheats like a dream and keeps for days. Pack it cold for work or freeze portions for those nights when you’d rather scroll than cook. Honestly, the way the cheeses hold together means it’s still delicious straight from the fridge—no sad, dry rice here.
- Budget-Friendly Feast: Chicken thighs and rice stretch further than you’d think, and a block of cheddar goes a long way when you’re mixing it with mozzarella. I’ve fed six people for under $15 with this—plus, it’s the kind of dish that makes leftovers feel like a treat, not a chore. Win-win.
Step-by-step instructions for cheesy chicken baked rice
Here's how to create a dish where crispy chicken meets perfectly melted cheese in every bite.
Sauté Chicken and Aromatics for Maximum Flavor
Heat the 2 tablespoons olive oil in a large skillet over medium-high heat until shimmering. Add the 1.5 pounds boneless, skinless chicken thighs, cut into bite-sized pieces, and cook for 5-6 minutes until the chicken is no longer pink in the center and has lightly browned. Remove the chicken from the skillet and set it aside.
In the same skillet, add the 1 whole yellow onion, diced, and the 4 cloves garlic cloves, minced. Cook for 3-4 minutes until the onion is soft and translucent and the garlic is fragrant. This step builds the flavor foundation for your dish—don't skip it. The onions should be tender but not browned, and the garlic should smell like it just came from the garden.
Create the Crispy Topping and Prepare the Rice Mixture
In a separate bowl, melt the 0.5 cup butter until completely liquid. Add the 0.25 cup all-purpose flour and whisk vigorously until you have a smooth, thick paste. This is your crispy topping mixture, and it's what will give your baked rice that irresistible golden crust. Set this aside for now.
In a large mixing bowl, combine the 2 cups long-grain white rice with the 2 cups chicken broth, 1.5 teaspoons salt, and 0.5 teaspoon black pepper. Stir gently to distribute the seasoning evenly. The rice should be fully coated with the broth, but not soggy—just enough to absorb the flavors. This mixture will form the creamy base of your dish.
Assemble and Layer for Perfect Texture
In a greased 9x13-inch baking dish, spread half of the rice mixture evenly across the bottom. Sprinkle 1 cup shredded cheddar cheese and ½ cup mozzarella cheese over the rice. Add half of the sautéed chicken and half of the onion-garlic mixture on top. Repeat the layers, finishing with the remaining cheese.
Pour the melted butter-flour mixture evenly over the top of the baking dish. Use a spatula to spread it out into an even layer—this will create that coveted crispy crust. The butter-flour mixture should cover the entire surface, leaving no gaps for steam to escape. This step is crucial for achieving the perfect texture contrast between the crispy top and creamy interior.
Bake Until Golden and Bubbly
Cover the baking dish tightly with aluminum foil and bake in a preheated 375°F oven for 45 minutes. After 45 minutes, remove the foil and increase the oven temperature to 400°F. Bake uncovered for an additional 15-20 minutes until the top is deep golden brown and the cheese is fully melted and bubbly.
You'll know it's done when the top is crispy enough to resist a gentle press with your finger and the edges pull away slightly from the sides of the dish. The cheese should be melted throughout, with just a few small pockets of resistance indicating it hasn't fully combined. The total baking time should be about 1 hour to 1 hour 10 minutes, depending on your oven.
Rest and Serve with Fresh Garnish
Remove the baking dish from the oven and let it rest for 10 minutes before serving. This resting period allows the cheese to set slightly and makes it easier to slice. The dish will be hot, so use oven mitts to handle the baking dish carefully.
Garnish with the 1 tablespoon dried parsley for a pop of color and freshness. The parsley adds a subtle herbal note that complements the rich, cheesy flavors. Serve immediately while the cheese is still melty and the crust is crispy. Each bite should offer a perfect balance of tender chicken, creamy rice, and that satisfying crunch from the golden topping.
Pro Tips For Making Cheesy Chicken Baked Rice
- SEAR CHICKEN FIRST: Walk away from the stovetop if you’re tempted to skip browning—this isn’t just for looks. Cook the chicken thighs in a dry pan until they hit 165°F internally, then pull them out and let them rest while you prep the rice. That crust keeps the chicken juicy and stops it from turning rubbery when mixed with the broth later.
- LAYER CHEESE LIKE A LASAGNA: Dump all the cheese on top at once? Big mistake. Sprinkle half the cheddar and mozzarella between the rice and chicken layers, then top with the rest—this guarantees every bite has melty goodness, not just the surface. (Yes, it’s one extra step, but your future self will curse you if you don’t.)
- USE FULL-FAT BROTH: That low-sodium, watery chicken broth you grabbed on sale? Toss it. Even if you dilute it, full-fat broth adds richness that turns soggy rice into creamy, flavor-packed rice. I learned this after making the same recipe twice with "light" broth and wondering why it tasted bland—fat is flavor, and this dish needs it.
- BAKE UNTIL THE CRUST CRACKS: The cheese should be bubbling so hard it pulls away from the edges and forms a golden, slightly crispy top—like a gratin. If you’re checking at 350°F after 20 minutes and it’s still sad and pale, crank the oven to 400°F for the last 5-10 minutes. (Your broiler’s a cheat code here, but watch it like a hawk.)
Common mistakes when making perfect results
Overcooking the Chicken
I’ve seen this happen more times than I can count—chicken that’s dry and tough instead of juicy and tender. The key is to remove the chicken from the skillet as soon as it reaches 165°F internal temperature (about 5-6 minutes for bite-sized pieces).
Overcooking releases moisture, turning it rubbery. Use an instant-read thermometer for precision—it’s a game-changer. 🌡️
Skipping the Resting Period
Rushing to serve this dish right out of the oven is a mistake. The 10-minute rest lets the cheese set slightly and redistributes juices, keeping the rice creamy.
Without it, the cheese might slide off your fork, and the texture will feel uneven. Trust me, patience here makes all the difference.
Uneven Cheese Distribution
If your cheese isn’t melting evenly or pooling in spots, it’s likely because you didn’t spread the butter-flour topping evenly. Use a spatula to create a thin, uniform layer—this ensures even browning and crispiness.
Another tip: Sprinkle cheese in a rain-like pattern before adding the butter mixture to distribute it more evenly.
Using the Wrong Cheese
Not all cheeses melt the same way. Low-moisture mozzarella is a must for preventing a soggy top, while sharp cheddar adds tangy depth. Avoid pre-shredded cheese (it has anti-caking agents that prevent proper melting).
If you’re short on mozzarella, a mix of Parmesan and cheddar works, but the texture will differ slightly.
Baking at Too Low a Temperature
If your dish isn’t getting that golden crust, your oven might be too cool. Start at 375°F to cook through, then crank it up to 400°F for the final 15-20 minutes to crisp the top.
A toaster oven or broiler can help achieve that perfect caramelization if your oven runs hot or cold.
Not Greasing the Baking Dish
If your rice sticks to the dish, it’s because you skipped this crucial step. Use nonstick spray or brush the dish with butter before adding the rice mixture.
A well-greased dish ensures easy slicing and a clean presentation. I also recommend using a 9x13-inch baking dish**—it’s the perfect size for even baking and layering.
Nutrition facts
Frequently asked questions
Can I use chicken breasts instead of thighs?
You can try, but thighs stay juicier with their higher fat content. If using breasts, cut them into ½-inch thick pieces and cook for only 4-5 minutes to avoid drying out. For best results, marinate breasts in buttermilk for 30 minutes before cooking to keep them tender.
How do I make this dish vegetarian?
Swap the chicken for 1.5 pounds of crumbled firm tofu or chickpeas (drained and rinsed). Use vegetable broth instead of chicken broth, and add 1 teaspoon smoked paprika to the rice for depth. The cheese layers will still create that satisfying texture!
Why is my cheese not melting properly?
Pre-shredded cheese often contains anti-caking agents that prevent melting. Use block cheese and shred it yourself, then pat it dry with a paper towel. Also ensure your oven reaches 400°F during the final crisping phase—this creates the heat needed for perfect melty cheese.
Can I make this ahead of time?
Yes! Assemble the dish (up to the butter-flour topping) and refrigerate for up to 24 hours. When ready to bake, add the topping and bake as directed. For freezing, bake completely, cool, wrap tightly, and freeze for up to 3 months. Reheat covered at 350°F for 20 minutes to restore crispiness.
What's the secret to the crispy top?
The butter-flour mixture is key—it creates a golden, crunchy crust. Spread it evenly and thinly over the top, then bake uncovered at 400°F for the final 15-20 minutes. For extra crunch, sprinkle ½ cup panko breadcrumbs on top before baking.