Main Courses
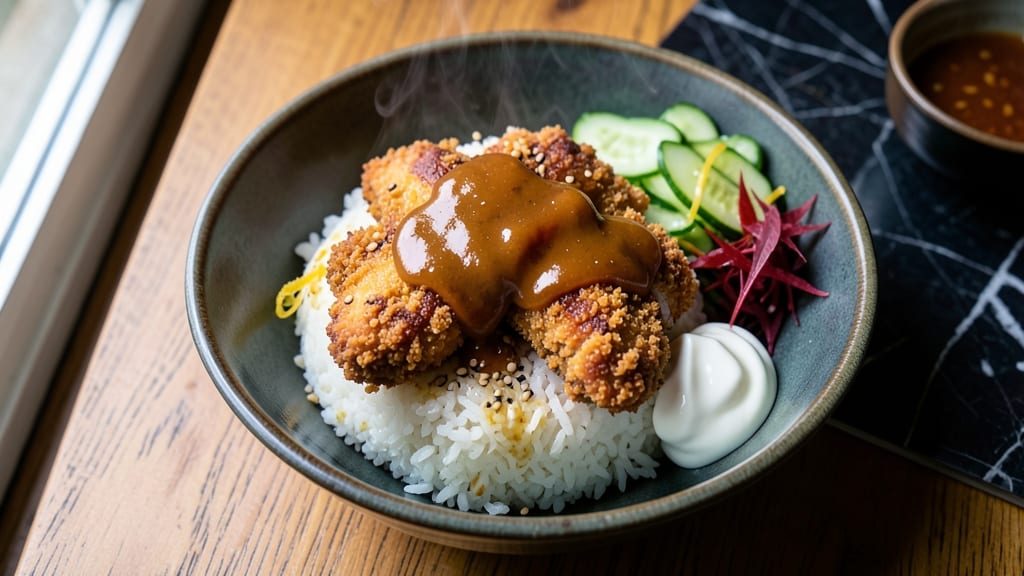
This crispy chicken katsu rice bowl delivers the perfect balance of golden panko crust and savory tonkatsu sauce in every bite. 🔥 After years of perfecting Japanese home cooking techniques, I've developed a method that ensures tender chicken with an irresistible crunch—no deep-frying required.
The secret lies in a light tempura batter and precise pan-frying that locks in juiciness while creating that signature crispy texture.
What makes this recipe special is the combination of restaurant-quality components: tender chicken katsu, fluffy Japanese short-grain rice, and a rich tonkatsu sauce that ties everything together.
I've included traditional toppings like shredded cabbage and raw egg (ajitsuke tamago) for authenticity, but you can easily customize with modern twists like spicy mayo or avocado. The key is getting the chicken perfectly cooked and sliced before assembling the bowl.
By the time you're done, you'll have a bowl that's crispy on the outside, tender on the inside, and packed with layers of flavor. The panko crust shatters with each bite, releasing juicy chicken that's been perfectly seared.
This is comfort food elevated—simple enough for weeknights but impressive enough for dinner guests. The rice absorbs the tonkatsu sauce beautifully, creating a cohesive meal that's both satisfying and balanced.
This recipe works equally well as a main dish or light lunch, and leftovers reheat beautifully. Let's get started on creating your perfect chicken katsu rice bowl! The technique is straightforward once you understand the key steps—prepping the chicken, mastering the pan-fry, and assembling with care.
You'll be rewarded with a dish that tastes like you've been cooking Japanese cuisine for years.
Ingredients for chicken katsu rice bowl
Golden panko crust meets tender chicken and rich tonkatsu sauce—here's what you'll need for the perfect bowl.
| Ingredient | Amount | Notes |
|---|---|---|
| Boneless, Skinless Chicken Breasts 🍗 | 1 ½ lb | Pounded to 1/4-inch thickness |
| Japanese Panko Breadcrumbs 🍞 | 2 cups | Light and crispy variety |
| All-Purpose Flour 🌾 | ½ cup | For light tempura batter |
| Large Eggs 🥚 | 2 whole | Separated for batter |
| Japanese Tonkatsu Sauce 🍅 | ¾ cup | Homemade or quality store-bought |
| Japanese Short-Grain Rice 🍚 | 2 cups | Uncooked, sushi rice preferred |
| Green Cabbage 🥬 | 4 cups | Shredded, for crunch |
| Ajitsuke Tamago (Marinated Eggs) 🥚 | 2 whole | Store-bought or homemade |
| Vegetable Oil 🫒 | ½ cup | High smoke point preferred |
| Dried Shallots 🧅 | 1 tsp | For garnish |
| Sesame Seeds 🌾 | 1 tbsp | Toasted, for garnish |
| Diamond Crystal Kosher Salt 🧂 | 1 tsp | For seasoning |
| Ground Black Pepper 🌶️ | ½ tsp | Freshly ground |
| Rice Vinegar 🍶 | 1 tbsp | For rice seasoning |
| Sugar 🍚 | 1 tsp | For rice seasoning |
The chicken is where it all starts. Look for boneless, skinless breasts with even thickness—thinly pounded pieces ensure perfect cooking and that signature crisp. Trader Joe's has great pre-pounded chicken, but if you're pounding yourself, go for 1/4-inch thickness—any thicker and it won't cook through properly. The panko matters too—Japanese-style panko (like Suzuki brand) is lighter and crunchier than regular breadcrumbs. If you can't find it, toast regular panko in a dry pan for 2-3 minutes to enhance its flavor. Freshly cracked black pepper and kosher salt are non-negotiable here—they brighten the chicken before it hits the pan.
No tonkatsu sauce? Worcestershire sauce plus a splash of soy sauce and ketchup gets you close, but it won't be quite the same. The rice is your canvas—short-grain Japanese rice (like Koshihikari) absorbs the sauce beautifully, but if you're in a pinch, jasmine rice works too. For the cabbage, green cabbage is traditional, but red cabbage adds a pretty pop of color. The marinated eggs? Store-bought ajitsuke tamago from an Asian market saves time, but you can make your own by simmering hard-boiled eggs in soy sauce, mirin, and sugar. The dried shallots and sesame seeds are just for garnish, but they add that restaurant-quality finish—don't skip them if you're going for authenticity.
Chicken stays crispy for about 20 minutes after frying, so assemble bowls right away. The rice keeps for 3-4 days in the fridge, but it's best served fresh. Panko loses its crunch after a day, so make only what you need or store the cooked chicken separately. For leftovers, reheat the rice and chicken separately—microwaving the chicken will make it soggy. This bowl tastes even better the next day once everything has a chance to meld, so double the recipe if you're feeding a crowd—they'll disappear fast.
Why You'll Love This Recipe
- Crisp in Minutes: I swear by the double-dip method—flour, egg, panko—because that first fry gives you a shatteringly crisp crust in under 10 minutes. No waiting for breading to set, no soggy disappointments. Just slice the chicken thin, let the panko cling like it’s auditioning for a role, and you’re golden.
- Sauce Magic: That tonkatsu sauce? It’s the secret weapon. Sweet, tangy, with just enough umami to make your bowl taste like a hug from a Japanese diner. Drizzle it over the hot chicken, and suddenly you’ve got restaurant-quality flavor without the takeout markup.
- Lunchbox Hero: Between us, this is my go-to for meal prep. The chicken stays crispy for days if you fry it fresh and store it separately, then toss everything together in the morning. Kids love the fun shape, and honestly? So do I.
- Budget Crunch-Saver: Panko and chicken breasts stretch further than you’d think. I make a double batch on Sundays—one for dinner, one for leftovers—and still have enough for lunch the next day. Plus, tonkatsu sauce lasts forever, so you’re not scrambling for fancy ingredients.
Step-by-step instructions for crispy chicken katsu rice bowls
Here's how to build the perfect bowl with golden panko crust and rich tonkatsu sauce.
🍳 Step 1: Prepare the Chicken Cutlets with Perfect Crust
Pound the 1.5 lb boneless, skinless chicken breasts to an even ¼-inch thickness between two sheets of plastic wrap. This ensures even cooking and maximum crispiness. Season both sides generously with 1 tsp Diamond Crystal kosher salt and 0.5 tsp freshly ground black pepper, pressing the seasoning into the meat.
Set up three shallow bowls: one with the 0.5 cup all-purpose flour, one with the 2 whole beaten eggs, and one with the 2 cups Japanese panko breadcrumbs. Dredge each cutlet first in flour (shake off excess), then dip in egg (let excess drip off), and finally press into panko, coating both sides completely. The panko should adhere firmly—this is what creates that signature crispy crust. Work in batches to keep everything dry and crumbly.
🔥 Step 2: Fry to Golden Perfection
Heat the 0.5 cup vegetable oil in a large skillet over medium heat until it reaches 350°F—use a thermometer to be precise. This temperature gives you that perfect balance between crispy crust and tender chicken inside. Fry the cutlets for 3-4 minutes per side until they're deep golden brown and the internal temperature reaches 165°F. Don't overcrowd the pan or the oil temperature will drop, leading to greasy instead of crispy results.
Transfer the cooked chicken to a paper towel-lined plate to drain excess oil. The crust should be shatteringly crisp—if it's not golden enough, return the cutlets to the pan for another 30 seconds to finish browning. Real talk: this is where the magic happens, so don't rush it. The cutlets will continue cooking slightly as they rest, so pull them out when they're just barely done.
🍚 Step 3: Cook the Japanese Short-Grain Rice
Rinse the 2 cups uncooked Japanese short-grain rice under cold water until the water runs clear—this removes excess starch and prevents gummy rice. Cook it according to package instructions (typically a 1:1 rice-to-water ratio, simmering for 15 minutes after boiling), then fluff with a fork. While still hot, mix in the 1 tbsp rice vinegar and 1 tsp sugar, stirring gently to combine. This simple seasoning transforms ordinary rice into the perfect base for your katsu bowl.
Here's the thing—don't skip the vinegar and sugar. They brighten the rice and balance the richness of the tonkatsu sauce. For extra fluffiness, spread the cooked rice on a tray and let it sit uncovered for 5 minutes before serving. This allows any remaining steam to escape, giving you that individual grain texture that's essential for proper rice bowls.
🥘 Step 4: Assemble the Bowls with Crunch and Garnish
Divide the cooked rice evenly among four bowls. Top each with one crispy chicken cutlet, then drizzle with 2 tablespoons of the 0.75 cup Japanese tonkatsu sauce. Add the 4 cups shredded green cabbage for that essential crunch, and place one ajitsuke tamago (marinated egg) on top of each bowl. The cabbage should be cold—shock it in ice water for 10 minutes before assembling to maintain crispness.
Finish with 1 tsp dried shallots and 1 tbsp toasted sesame seeds. Here's where it gets fun—sprinkle them generously. The shallots add a subtle onion flavor without overpowering, while the sesame seeds provide that nutty crunch that ties everything together. Serve immediately while the chicken is still crispy and the rice is hot—this dish is all about that perfect temperature contrast.
Pro Tips For Making Chicken Katsu Rice Bowl
- Pound Chicken Evenly: I learned this the hard way—uneven thickness means some parts overcook while others stay underdone. Use a meat mallet or rolling pin to tap the breasts down to ¼-inch thickness, then flip and repeat. A ruler helps check consistency.
- Use Cold Eggs for Crispier Crust: I was skeptical until I tried it: chill the beaten eggs in the fridge for 15 minutes before dredging. The colder egg coats the chicken more evenly, so the panko sticks better and crisps up like a proper tonkatsu cutlet—not a sad, greasy mess.
- Don’t Overcrowd the Fryer: This isn’t the prettiest method, but it’s the tastiest: fry in batches of 2-3 pieces max to keep the oil at a steady 350°F (175°C). Overcrowding drops the temp, and you’ll end up with soggy, greasy katsu instead of golden, shatteringly crisp edges.
- Skip the Pre-Heating Oil Trick: After burning three batches, I finally figured out the oil doesn’t need to be smoking hot when you add the chicken. Just keep it hot enough to sizzle immediately—about 3-4 minutes of heating is enough. Pre-heating too long breaks down the oil faster, and you’ll taste it in the final dish.
Best sauces and condiments for this chicken katsu rice bowl
Tonkatsu Sauce
This is the star of your bowl, and it's worth investing in quality. I recommend Kewpie Tonkatsu Sauce—it's the gold standard for a reason. The sauce has a perfect balance of sweet, tangy, and umami flavors that complement the crispy chicken beautifully.
If you can't find it, Worcestershire sauce mixed with 1 tbsp ketchup and 1 tsp soy sauce per ¼ cup makes a decent substitute. 🍅
For a homemade version, simmer ½ cup ketchup, ¼ cup Worcestershire sauce, 2 tbsp soy sauce, 1 tbsp honey, and 1 tsp grated ginger for 10 minutes.
Strain out the ginger and let it cool before using. This homemade sauce adds a subtle depth that store-bought versions sometimes lack.
Spicy Mayo
This modern twist takes your bowl to the next level. Mix ¼ cup mayonnaise with 1 tbsp sriracha and 1 tsp honey for a perfect balance of heat and sweetness. Drizzle this over your bowl instead of tonkatsu sauce for a bold flavor profile.
I like to add a pinch of garlic powder for extra depth. This sauce works especially well with the crispy chicken and cold cabbage.
For an extra kick, add ½ tsp gochujang (Korean chili paste) to the mix. The fermented heat pairs beautifully with the crispy panko and tender chicken. Keep this sauce separate until serving so the heat doesn't soften the chicken's crust.
Egg Sauce
This creamy, tangy sauce is a Japanese restaurant staple. Whisk together 2 tbsp mayonnaise, 1 tbsp ketchup, 1 tbsp tonkatsu sauce, 1 tsp rice vinegar, and a pinch of paprika.
Drizzle this over your bowl just before serving to add a rich, velvety texture. The acidity from the vinegar cuts through the richness of the chicken and sauce.
For a lighter version, replace half the mayo with Greek yogurt. This keeps the sauce creamy while adding a subtle tang. I often use this version when I want to keep the bowl lighter but still packed with flavor. It's especially good with the marinated eggs on top.
Pickled Ginger
No katsu bowl is complete without a side of beni shoga (pickled ginger). The bright pink color and tangy flavor cut through the richness of the chicken and sauce. Look for it in the Asian foods section of your grocery store.
If you can't find it, you can make a quick substitute by thinly slicing 1-inch fresh ginger, simmering it in ½ cup rice vinegar with 1 tbsp sugar for 10 minutes, then cooling.
Serve the pickled ginger on the side so guests can add as much or as little as they like. The acidity helps cleanse your palate between bites, making each mouthful of crispy chicken even more enjoyable. It's a small detail, but it makes a big difference in the overall experience.
Sesame Dressing
For a nutty, aromatic touch, whip up a quick sesame dressing by mixing 2 tbsp tahini, 1 tbsp soy sauce, 1 tbsp rice vinegar, 1 tsp honey, and 1 tsp toasted sesame oil.
Thin with 1-2 tbsp water until it reaches a drizzling consistency. This dressing pairs beautifully with the crispy chicken and adds a subtle earthiness that complements the other flavors.
Drizzle this over the cabbage before assembling the bowl, or serve it on the side for dipping. The toasted sesame oil adds a rich, nutty aroma that enhances the overall dish. It's especially good if you're serving the bowl with a side of edamame or steamed vegetables.
Nutrition facts
Frequently asked questions
Can I use chicken thighs instead of breasts for this recipe?
Yes, but with adjustments! Chicken thighs stay juicier but may not get as crispy. Pound them to ½-inch thickness and fry at 325°F for 5-6 minutes per side to avoid overcooking. The skin-on version adds extra flavor—just remove it before breading. For best results, trim excess fat to prevent splattering.
How do I keep the panko crust from getting soggy?
Timing is everything! Fry the chicken just before serving and keep it warm in a 200°F oven on a wire rack (not plate) for up to 20 minutes. Assemble bowls last-minute—never reheat the chicken in the microwave. For extra insurance, sprinkle the fried cutlets with ½ tsp cornstarch before serving to absorb moisture.
What's the best way to make the rice extra fluffy?
Rinse the rice until water runs clear, then cook it in a rice cooker with 1:1 rice-to-water ratio. After cooking, spread it on a tray and let it sit uncovered for 5 minutes to release steam. For restaurant-style fluffiness, use ½ cup less water and add 1 tsp vinegar to the cooking water. Never stir the rice after cooking!
Can I make this recipe ahead of time?
Yes, but strategically! Cook the rice and chicken separately, then refrigerate for up to 2 days. Reheat rice in a steamer or microwave with a damp paper towel. For the chicken, reheat in a 350°F oven for 10 minutes on a wire rack. Assemble bowls fresh—this maintains the crispy texture. The tonkatsu sauce and marinated eggs can be prepped 1 day ahead.
What if I don't have tonkatsu sauce?
No problem! Mix ¼ cup ketchup with 2 tbsp Worcestershire sauce, 1 tbsp soy sauce, and 1 tsp honey for a quick substitute. For deeper flavor, add ½ tsp grated ginger or a dash of smoked paprika. This homemade version works perfectly with the crispy chicken and rice. Store-bought BBQ sauce also works in a pinch!