
Main Courses
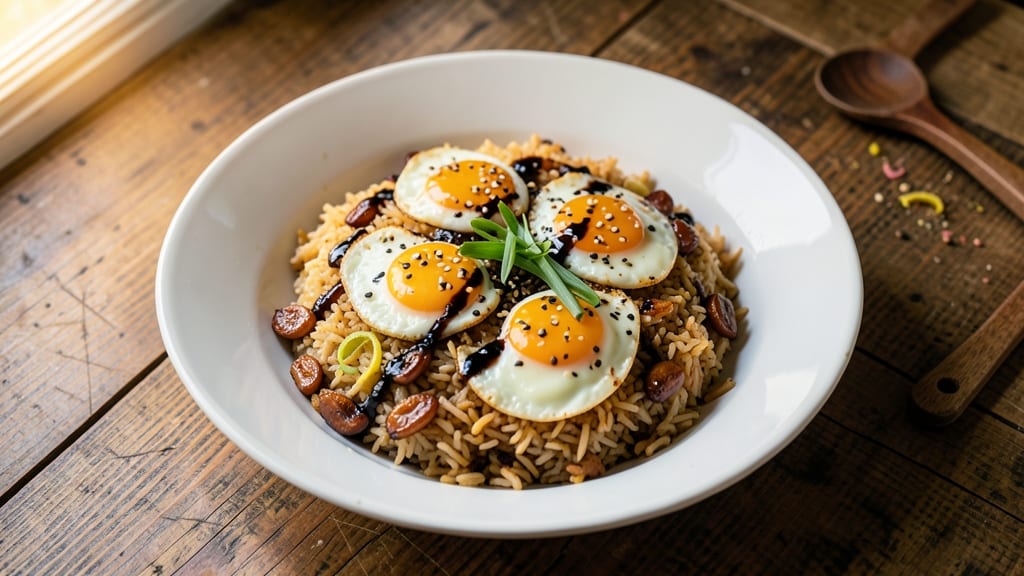
Burnt garlic egg fried rice delivers the perfect balance of smoky crunch and silky egg ribbons in every bite. The secret lies in caramelizing whole garlic cloves until they're deep golden-brown with a fragrant, almost sweet aroma—this is what transforms ordinary fried rice into something extraordinary. I've perfected this technique over countless batches, ensuring the garlic achieves that coveted burnt yet complex flavor without overpowering the dish.
What sets this recipe apart is the high-heat wok technique that creates wok hei—that signature smoky aroma and crispy texture. We'll start by frying the garlic until it's fragrant and slightly burnt, then push it to one side of the pan to make room for the eggs.
Scrambling the eggs quickly over high heat creates delicate ribbons that cling beautifully to the rice, while the burnt garlic adds a layer of depth that elevates every component. The result is a dish that's both restaurant-quality and completely achievable at home.
Ingredients for burnt garlic egg fried rice
Twelve ingredients, one wok, and the art of balancing smoky garlic with delicate egg ribbons.
| Ingredient | Amount | Notes |
|---|---|---|
| Day-Old Cooked White Rice 🍚 | 4 cups | Cold, preferably day-old |
| Large Eggs 🥚 | 4 whole | Room temperature preferred |
| Whole Garlic Cloves 🧄 | 12 cloves | Unpeeled, medium-sized |
| Vegetable Oil 🫒 | ½ cup | High smoke point preferred |
| Green Onions 🧅 | ½ cup | Thinly sliced, white and green parts |
| Soy Sauce 🥢 | 3 tbsp | Light or all-purpose |
| Sesame Oil 🫒 | 1 tbsp | Toasted, for aroma |
| Oyster Sauce 🍲 | 1 tbsp | Optional, for depth |
| White Pepper 🌶️ | ¼ tsp | Freshly ground preferred |
| Salt 🧂 | ½ tsp | Kosher or sea salt |
| Black Pepper 🌶️ | ¼ tsp | Freshly ground preferred |
| Fresh Ginger 🧅 | 1 tbsp | Finely grated, aromatic |
The garlic is non-negotiable—medium-sized cloves caramelize perfectly, developing that coveted burnt yet aromatic sweetness. Whole Foods or local Asian markets often carry larger cloves ideal for this technique. Avoid pre-minced garlic; the whole cloves create a better crust. For the rice, day-old is essential—it absorbs flavors better than fresh-cooked rice. If using basmati or jasmine, cook it slightly underdone and spread it on a tray to cool faster. The eggs should be room temperature for even cooking, so take them out of the fridge 30 minutes before starting.
No sesame oil? Toasted peanut oil works in a pinch, though sesame's nutty aroma is ideal. Substitute oyster sauce with extra soy sauce plus a splash of mirin if needed. For the green onions, scallions or chives add a milder flavor. The ginger can be swapped for 1/2 teaspoon ground ginger, but fresh is far superior. If you're sensitive to garlic's intensity, start with 8 cloves instead of 12 and adjust to taste. The vegetable oil should have a high smoke point—avoid olive oil, which burns too easily at wok temperatures.
Store any leftovers in an airtight container for up to 3 days in the fridge, though this dish reheats best when fresh. The burnt garlic flavor intensifies when reheated, so save a portion for the next day if possible. For longer storage, freeze portions in single layers for up to 3 months. To revive, reheat in a dry skillet over medium heat with a splash of water. The eggs and garlic lose crispness when reheated, so this dish is best enjoyed within 24 hours of cooking.
Why You'll Love This Recipe
- Here’s what sold me: those whole cloves, charred until they’re sticky and sweet, then smashed into the rice. That crispy edge with the creamy center? Chef’s kiss.
- One-Pan Magic: I swear by this recipe when I’m too tired to scrub a million bowls—just toss everything into one skillet. The rice, eggs, and garlic all get their own space to shine without the mess.
- Garlic Overload (In the Best Way): Here’s what sold me: those whole cloves, charred until they’re sticky and sweet, then smashed into the rice. That crispy edge with the creamy center? Chef’s kiss.
- Lunchbox Hero: Between us, this is my go-to for meal prep—stays fresh for days, reheats like a dream, and my kids actually eat it. Pack it cold or warm, it’s always a win.
Step-by-step instructions for burnt garlic egg fried rice
Master this technique for perfect charred garlic and silky egg ribbons every time.
Prepare the Burnt Garlic Base
Heat a wok or large skillet over medium-high heat until it's very hot. Add the 0.5 cup vegetable oil and let it shimmer for 1 minute. The oil should be hot enough to sizzle when the garlic hits it.
Add the 12 unpeeled whole garlic cloves and stir constantly for 2-3 minutes until they turn deep golden brown with blackened edges. Watch closely—they'll burn quickly once they start browning. Remove the cloves with tongs and set aside, leaving the oil in the pan. This charred garlic will provide the signature smoky crunch.
In the same pan, add the 1 tablespoon finely grated fresh ginger and stir for 30 seconds until fragrant. Remove the ginger and set aside with the garlic. You've now created the aromatic foundation for your fried rice.
Scramble the Eggs to Ribbon Perfection
Return the wok to medium heat and add the 4 whole large eggs that have been beaten lightly in a bowl. Let them sit undisturbed for 5 seconds before gently pushing them around with a spatula, creating soft curds.
Continue cooking for 20-30 seconds until the eggs are just set but still slightly runny in the center. The goal is silky ribbons that coat each grain of rice. Remove the eggs and set aside temporarily—they'll finish cooking when combined with the rice.
Here's the thing—if you cook the eggs too long, they'll become rubbery. You want them to stay tender and cling to the rice perfectly. The residual heat from the rice will finish them off beautifully.
Stir-Fry the Day-Old Rice
Add the 4 cups day-old cooked white rice to the wok and break up any clumps with your spatula. Stir-fry for 1-2 minutes until the rice is heated through and the edges begin to turn golden. The day-old rice is crucial—it absorbs flavors better than fresh rice.
Return the charred garlic cloves and ginger to the pan, crushing them slightly with your spatula. Add the 0.5 cup thinly sliced green onions and stir for another 30 seconds to distribute the flavors evenly. The garlic should release its intense, smoky aroma as it warms.
Season and Combine
Create a seasoning slurry by mixing together 3 tablespoons soy sauce, 1 tablespoon oyster sauce, 1 tablespoon sesame oil, 0.5 teaspoon salt, 0.25 teaspoon white pepper, and 0.25 teaspoon black pepper in a small bowl. Pour this over the rice and stir vigorously for 1 minute.
Return the silky egg ribbons to the wok and toss everything together for another 30 seconds until the eggs are fully heated through and the rice is well-coated. The combination of the charred garlic, tender eggs, and perfectly seasoned rice creates a symphony of textures and flavors.
Finish and Serve
Taste the fried rice and adjust seasoning if needed—add a splash of water or more soy sauce if the rice seems too dry. The dish should be perfectly balanced with umami from the soy and oyster sauces, a touch of heat from the black pepper, and the distinctive charred garlic aroma.
Transfer to serving plates immediately and garnish with any remaining green onion slices. Serve while hot, with the charred garlic pieces distributed throughout each serving. The contrast of the crispy garlic against the tender rice and silky eggs makes this dish truly exceptional.
Pro Tips For Making Burnt Garlic Egg Fried Rice
- CRANK THE HEAT HIGH: The garlic needs to burn—don’t be shy. Use a wok or heavy skillet on full flame until the oil shimmers, then add the whole cloves. Let them sizzle and blacken for 30 seconds before stirring (yes, even if your kitchen smells like a fire alarm). I used to cook this at medium heat, and the garlic just browned—now I get that deep, smoky char that makes the dish sing.
- SMASH THE EGGS FIRST: Crack the eggs into a bowl, then smash them with a fork until the whites are frothy but not fully emulsified. This creates tiny air pockets that cook into light, custardy curds instead of rubbery blobs. I learned this after making egg fried rice where the eggs turned out greasy and dense—now they’re the star of the dish.
- USE COLD, DRY RICE: Spread day-old rice on a tray and let it sit uncovered for 10 minutes before cooking. Cold rice absorbs the garlic oil better and stays separate instead of turning into mush. I used to skip this step and ended up with a gluey mess—now the grains stay distinct, and the burnt garlic flavor clings to each one.
- STOP STIRRING BEFORE FINISHING: Let the rice cook undisturbed for 30 seconds after the liquid evaporates—this lets the bottom crisp slightly. Then toss in the green onions and give it one final stir. I used to keep moving the rice, and it never got that perfect balance of tender and toasty. Now it’s got texture in every bite.
Essential equipment for this dish
Wok Essentials
A carbon steel wok is my go-to for this recipe—it heats up quickly and retains heat perfectly, which is crucial for achieving that signature wok hei aroma. I recommend a 14-inch wok for this serving size, like the Made In wok from Amazon.
If you don’t have a wok, a heavy-bottomed cast iron skillet (like Lodge) works well too, though it won’t give you the same dramatic heat distribution. 🔥
High-Heat Oil
You’ll need high-smoke-point oil to fry the garlic without burning it prematurely. I use avocado oil or vegetable oil (like Mazola) because they can handle the high heat without breaking down.
Avoid olive oil—it burns too easily and adds unwanted flavors. A wire whisk (like OXO Good Grips) helps stir the garlic constantly for even browning. 🫒
Garlic Tools
For the burnt garlic, you’ll want tongs (I use JYE stainless steel tongs) to safely remove the cloves once they’re charred. A garlic press isn’t ideal here—whole cloves create a better crust.
If you’re sensitive to garlic’s intensity, wear nitrile gloves while handling the raw cloves to avoid skin irritation. A small bowl for mixing the seasoning slurry is also essential. ✨
Egg Prep Tools
A silicon spatula (like OXO Good Grips) helps scrape up those delicate egg ribbons without breaking them. For the eggs, a small mixing bowl (preferably glass or ceramic) is best—it won’t absorb flavors like plastic might.
A fine-mesh strainer comes in handy if you want to strain the eggs for extra-smooth ribbons, though it’s optional. 🥚
Garnish & Serve
Fresh green onions need a sharp chef’s knife (like Mercer Culinary Genesis) for thin slicing. A small plate for garnishing and a serving spoon (preferably wooden or silicone) ensures the charred garlic pieces stay intact.
For extra crunch, toasted sesame seeds (from Penzeys) add a nice finishing touch. 🌿
Nutrition facts
Frequently asked questions
Why does the garlic need to be burnt for this recipe?
The burnt garlic creates a deep, smoky flavor that adds complexity to the dish. When charred properly, the garlic develops a sweet, almost caramelized taste with a crispy texture that contrasts beautifully against the silky egg ribbons and tender rice. This technique is key to achieving that restaurant-quality depth in every bite.
Can I use fresh rice instead of day-old rice?
Fresh rice works, but it won't absorb flavors as well and may turn mushy. For best results, use day-old rice that's been chilled and spread out on a tray to dry slightly. If you must use fresh rice, cook it slightly underdone and spread it on a tray to cool before using. The extra moisture in fresh rice can make your fried rice soggy.
How do I prevent the eggs from becoming rubbery?
Cook the eggs over medium heat for just 20-30 seconds until they're soft curds but still slightly runny. Remove them from the pan immediately and set aside—the residual heat from the rice will finish cooking them perfectly. Overcooking eggs is the #1 reason they turn rubbery in fried rice.
What if I don't have a wok?
A heavy-bottomed cast iron skillet (like Lodge) works well for this recipe. While it won't give you the same dramatic heat distribution as a wok, it can still achieve great results. The key is using high heat and keeping your pan moving to prevent sticking. If possible, try to find a wok—it's worth the investment for this dish!
Can I make this dish ahead of time?
This fried rice is best enjoyed fresh, but you can make a portion ahead. Store leftovers in an airtight container for up to 3 days in the fridge. Reheat gently in a dry skillet over medium heat with a splash of water. Note that the charred garlic flavor intensifies when reheated, so save some for the next day if possible.