
Main Courses
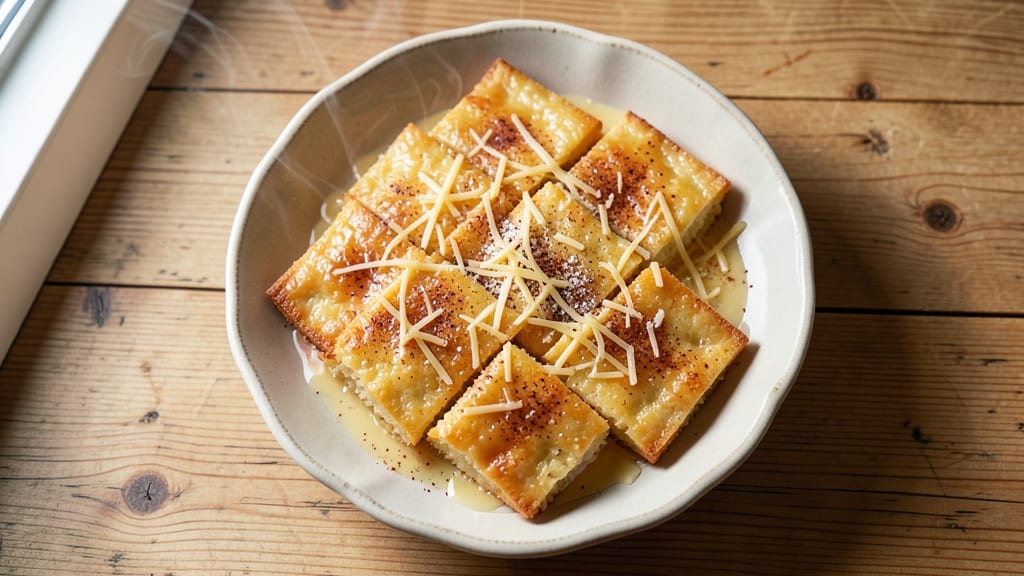
This cheese rice cakes recipe delivers crispy-crusted comfort with melty, stretchy centers that disappear in every bite. The secret lies in the perfect ratio of rice flour to shredded cheese, creating a golden exterior that contrasts beautifully with the gooey interior.
I’ve perfected this technique after countless batches—no more dry or greasy results.
What makes these rice cakes special is their foolproof method: mix, shape, and cook until golden brown. Whether pan-fried for extra crispiness or baked for a lighter version, each piece holds together perfectly while delivering that satisfying crunch.
The cheesy aroma alone makes them irresistible, and they’re ready in just 20 minutes—ideal for a quick lunch or appetizer that impresses.
Ingredients for cheese rice cakes
The perfect balance of crispy crust and melty cheese centers starts with these quality ingredients.
| Ingredient | Amount | Notes |
|---|---|---|
| Rice Flour 🌾 | 1 ½ cups | Glutinous or regular, sifted for lightness |
| Shredded Cheddar Cheese 🧀 | 2 cups | Freshly grated, full-fat preferred |
| All-Purpose Flour 🌾 | ½ cup | For binding, sifted |
| Large Eggs 🥚 | 2 whole | Room temperature for even mixing |
| Unsalted Butter 🧈 | 2 tbsp | Cold, cubed for even distribution |
| Milk 🥛 | ¼ cup | Whole milk for creaminess |
| Garlic Powder 🧄 | ½ tsp | For subtle depth of flavor |
| Ground Black Pepper 🌶️ | ¼ tsp | Freshly ground for best flavor |
| Diamond Crystal Kosher Salt 🧂 | ½ tsp | For seasoning, plus extra for frying |
| Vegetable Oil 🫒 | 1 cup | For frying, high smoke point |
| Panko Breadcrumbs 🍞 | ¼ cup | Optional for extra crunch |
The rice flour is non-negotiable—it creates that signature crispy texture. Bob’s Red Mill or Anthony’s Goods are my go-tos, but any quality brand works. For the cheese, freshly grated sharp cheddar makes all the difference—pre-shredded gets clumpy and lacks that stretchy melt. I always grab extra cheese since it’s a staple in my fridge. The butter should be cold when you mix it in; this ensures even distribution throughout the batter. If you're using a mix of cheeses, add Monterey Jack for extra creaminess.
No rice flour? Substitute with cornstarch at the same ratio, though texture will differ slightly. Short on butter? Olive oil or coconut oil works in a pinch, though butter gives the best flavor. The milk can be swapped for heavy cream if you want even more richness. For a gluten-free option, replace the all-purpose flour with gluten-free 1:1 flour blend. The panko is optional but worth it for that extra crunch—Trader Joe's has great-quality panko at a reasonable price.
Store the dry ingredients (flour, cheese, spices) in airtight containers for up to 3 months. The mixed batter keeps in the fridge for 2 days if sealed properly, though freshly made is always best. For leftover rice cakes, store in a single layer on a wire rack to prevent sogginess. They reheat beautifully in the oven at 350°F for 3-5 minutes—just until crispy again.
Why You'll Love This Recipe
- Zero-Mess Mixing: I swear by this recipe—just fold the shredded cheddar into the dry flours, crack in those eggs, and stir until it barely comes together. No overworking, no sticky disasters. The butter keeps everything tender without fighting you.
- Cheesy Crispy Magic: That first bite? Crunchy outside, gooey cheddar center—like a grilled cheese had a makeover. The rice flour gives it a lightness you won’t find in regular fried rice cakes, and the egg binds it just enough to hold its shape.
- Lunchbox Hero: Pack these cold or reheat them in seconds—they’re my go-to for lunches, potlucks, or even a fancy snack platter. Kids grab them straight from the fridge, and they taste just as good at room temp as they do warm.
- Pantry Staple Power: Honestly, you’re already stocked. Rice flour, eggs, butter—these are ingredients I always have, and they cost next to nothing. Make a batch, freeze extras, and pull them out whenever you need a quick, satisfying bite. No waste, all win.
Step-by-step instructions for cheese rice cakes
Master the art of golden crusts and gooey centers with this precise method.
Create the Perfect Batter
In a medium mixing bowl, combine the 1.5 cups rice flour and 0.5 cup all-purpose flour. Sift them together to eliminate any lumps - this ensures a smooth, even texture in your rice cakes. Create a well in the center and add the 2 whole large eggs, 0.25 cup milk, and 0.5 tsp garlic powder. Whisk vigorously until fully incorporated, scraping the sides of the bowl to capture any dry ingredients.
Next, fold in the 2 cups freshly grated cheddar cheese using a rubber spatula. Work quickly but gently to maintain the cheese's texture. The mixture should be thick and cohesive, similar to pancake batter. This is where the magic begins - the cheese will create those irresistible melty centers we're after. If the batter feels too dry, add 1 tablespoon milk at a time until it reaches a smooth, spreadable consistency.
Prepare the Frying Station
Fill a deep skillet with 1 cup vegetable oil and heat it over medium heat until it reaches 350°F. Use a deep-fry thermometer to monitor the temperature precisely - this is critical for achieving that perfect golden crust without burning the exterior. While the oil heats, cube the 2 tbsp unsalted butter and set it aside. You'll use these cold butter cubes to create pockets of extra richness in each rice cake.
In a small bowl, mix the 0.5 tsp Diamond Crystal kosher salt, 0.25 tsp ground black pepper, and 0.25 cup panko breadcrumbs. This seasoning blend will give your rice cakes that essential crunch and savory depth. Keep this mixture nearby as you'll need it for the final coating. The panko adds texture contrast that balances the creamy cheese filling.
Shape and Fry the Rice Cakes
Using a cookie scoop or tablespoon, portion out 2-tablespoon amounts of batter. Gently press each portion into a 1-inch thick disc shape on a floured surface. Create a small well in the center of each disc and place one butter cube in each well. This creates those irresistible pockets of melted butter that make these rice cakes so special.
Carefully lower one rice cake into the 350°F oil using a slotted spoon. Fry for 2-3 minutes per side until golden brown and crispy. You'll know they're ready when you see even browning and hear a slight sizzling sound. Avoid overcrowding the pan - fry one at a time to maintain proper oil temperature. As each rice cake cooks, transfer it to a paper towel-lined plate to drain excess oil.
Create the Crispy Crust
While the rice cakes are still warm from frying, roll each one in the panko-salt-pepper mixture, pressing gently to adhere the crumbs evenly. This step is crucial for that satisfying crunch that contrasts perfectly with the creamy cheese center. Work quickly as the rice cakes will begin to cool and lose their crispness. The panko should coat about 75% of each surface, leaving some areas exposed to maintain texture variety.
Place the finished rice cakes on a wire rack to cool for 5 minutes. This brief resting period allows the internal cheese to begin melting while maintaining the crisp exterior. Serve immediately while still warm - the contrast between the crispy crust and molten cheese center is what makes these rice cakes so irresistible. For best results, serve with a side of marinara sauce or a simple garlic aioli for dipping.
Pro Tips For Making Cheese Rice Cakes
- STIR THE BATTER HARD: Don’t just mix the rice flour, eggs, and butter like you’re making pancakes—beat this batter until it’s thick, sticky, and actually holds together. I used to slap it into the pan and wonder why my cakes crumbled. Now I use a wooden spoon and stir like I’m trying to break up a stubborn clump of cookie dough. The gluten (from the all-purpose flour) needs to wake up.
- GRATE YOUR OWN CHEESE: Store-bought shredded cheddar is coated in anti-caking agents that make your rice cakes gummy instead of crispy. Grab a box of block cheddar and pulse it in a food processor for 10 seconds—just enough to break it into rice-sized chunks. The texture changes everything, and you’ll notice the difference the first time you bite into a properly cheesy, not gluey, cake.
- PRESS THE BUTTONS FIRM: When you press the batter into the pan, don’t treat it like a delicate soufflé. Push down hard—like you’re trying to flatten a stubborn cookie dough ball. The cakes need that pressure to set properly and hold their shape. I learned this after making a batch that looked like sad, lumpy pancakes. A firm hand = cleaner edges and better texture.
- LET THEM REST BEFORE FLIPPING: The second your cakes hit the pan, they’ll look golden and ready to flip—but wait. Let them sit for 30 seconds, even if you’re impatient. The butter needs time to melt fully, and the outside needs to form a real crust. I used to flip too soon and end up with greasy, uneven cakes. Thirty seconds changes the game.
Make-ahead tips for this recipe
Batter Prep Ahead
Mix the batter up to 2 days in advance and store it in an airtight container in the fridge. The flavors meld beautifully overnight, and the cheese softens just enough for easier shaping.
When ready to cook, let the batter sit at room temperature for 10 minutes before shaping—this prevents cold spots in your rice cakes. 💡
Shaping Shortcuts
Use a cookie scoop or ice cream scoop (about 2 tablespoons) to portion batter consistently. For faster shaping, press each portion between two sheets of parchment paper—this prevents sticking and makes cleanup a breeze.
Prep all your discs at once and store them on a wire rack in the fridge for up to 1 hour before frying.
Freezer-Friendly Method
Shape the rice cakes as directed, but instead of frying immediately, place them on a parchment-lined tray and freeze for 30 minutes to firm up. Transfer to a ziplock bag with parchment between layers.
Fry straight from frozen—just add 30 seconds per side to your cooking time. They reheat perfectly in the oven at 350°F for 5 minutes if needed. ❄️
Batch Frying Tips
Keep cooked rice cakes warm in a 200°F oven on a wire rack while you finish frying the batch. This maintains crispiness without sogginess. For large groups, double the oil in your skillet and use a deep cast-iron pan—it holds heat better and reduces temperature fluctuations.
I love my Lodge 10.25-inch cast iron for this purpose.
Make-Ahead Serving
Assemble a complete meal by prepping marinara sauce or garlic aioli ahead and storing it in small ramekins. Package rice cakes in parchment-lined boxes with the sauce on the side for easy grab-and-go lunches. They stay crispy for 24 hours when stored this way. Perfect for meal prep! 📅
Nutrition facts
Frequently asked questions
Can I make these cheese rice cakes without frying?
For a baked version, preheat your oven to 375°F and place shaped rice cakes on a parchment-lined baking sheet. Brush the tops with a little oil and bake for 12-15 minutes until golden. The texture will be slightly less crispy but still delicious. For extra crunch, broil for 1-2 minutes at the end.
Why did my cheese rice cakes turn out greasy?
Greasy rice cakes usually happen from two issues: oil temperature or overcrowding the pan. Always maintain 350°F oil and fry one at a time to keep proper heat. Drain on a wire rack instead of paper towels to remove excess oil. For baked versions, ensure your oven rack is in the middle position for even cooking.
What's the best cheese substitute for dairy-free rice cakes?
Use a blend of nutritional yeast and vegan cheese shreds (like Violife or Daiya) for that melty texture. Start with 1.5 cups vegan cheese and add 1 tablespoon cornstarch to the batter for binding. The flavor won't be identical, but it creates a satisfying cheesy experience. For extra richness, add 1 tablespoon olive oil to the batter.
How do I make these rice cakes gluten-free?
Replace both the rice flour and all-purpose flour with a 1:1 gluten-free flour blend (like Bob's Red Mill). Add 1 extra tablespoon xanthan gum to the dry ingredients for proper binding. The texture will be slightly denser but still delicious. For extra crispiness, use gluten-free panko in the coating. Always check labels to ensure all ingredients are certified gluten-free.
Can I use this recipe for other cheeses?
Yes! Monterey Jack creates extra creaminess, while pepper jack adds a mild kick. For a smoky flavor, try smoked cheddar or gouda. Avoid soft cheeses like brie—they won't hold shape when frying. The cheese should be freshly grated for best texture. For a fun twist, mix half cheddar and half parmesan** for a savory depth.