
Main Courses
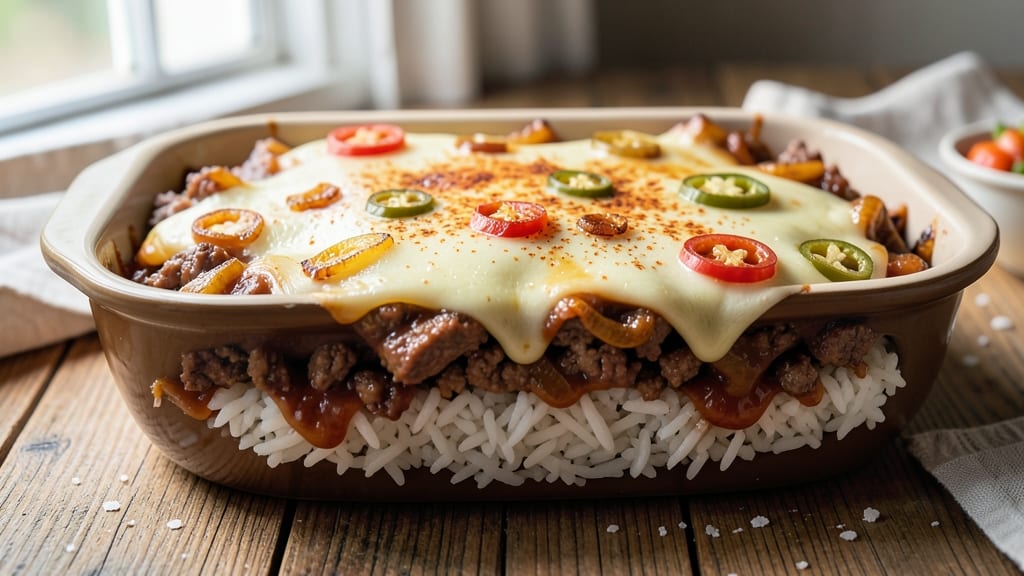
This cheeseburger rice casserole recipe transforms classic comfort food into a hearty, one-dish wonder that’s perfect for family dinners or meal prep. 💛 The secret lies in layering seasoned ground beef, melted cheese, and perfectly cooked rice—all baked together until golden and bubbly.
It’s the kind of dish that disappears faster than you can say "second helping," and it’s surprisingly easy to customize with toppings like pickles, onions, or jalapeños for extra flavor.
What makes this recipe stand out is how it combines the best of two beloved meals—juicy cheeseburgers and creamy rice—into a single, satisfying bake. With just 30 minutes of prep and 45 minutes in the oven, you’ll have a dish that’s rich, cheesy, and packed with savory beef.
The top layer of melted cheese creates a crispy crust, while the rice underneath stays tender and flavorful. It’s the ultimate crowd-pleaser, whether you’re feeding a hungry family or prepping for the week ahead.
Ingredients for cheeseburger rice casserole
Juicy beef, creamy cheese, and perfectly cooked rice—all you need for this ultimate comfort casserole.
| Ingredient | Amount | Notes |
|---|---|---|
| Ground Beef 🥩 | 1 ½ lb | 80% lean, finely chopped |
| Long-Grain White Rice 🍚 | 2 cups | Uncooked, medium grain preferred |
| Onion 🧅 | 1 whole | Medium size, finely diced |
| Garlic Cloves 🧄 | 3 cloves | Fresh, minced for depth |
| Ketchup 🍅 | ½ cup | For tangy depth |
| Worcestershire Sauce 💧 | 1 tbsp | For umami richness |
| Beef Broth 💧 | 1 cup | Low-sodium preferred |
| Shredded Cheddar Cheese 🧀 | 2 cups | Sharp cheddar for melt |
| Milk 🥛 | ½ cup | For creamy texture |
| All-Purpose Flour 🌾 | 2 tbsp | For thickening sauce |
| Salt 🧂 | 1 ½ tsp | Kosher salt preferred |
| Black Pepper 🌶️ | 1 tsp | Freshly ground |
| Butter 🧈 | 2 tbsp | Unsalted for flavor |
| Pickles 🥒 | ¼ cup | Chopped, optional topping |
The beef is the star here—80% lean ground beef gives you that perfect balance of flavor and texture. Grab the finely chopped variety at the meat counter (it cooks faster than regular ground beef). Costco or Walmart usually have it pre-chopped, which saves time. For extra flavor, look for beef with visible fat marbling—it keeps the casserole moist. The onion and garlic? Fresh is non-negotiable—dried powder won't give you that same savory punch. If you're prepping ahead, cook the rice separately and store it in the fridge until ready to assemble.
No Worcestershire sauce? Soy sauce at half the amount works in a pinch, but you'll lose some depth. The ketchup can be swapped for tomato paste (2 tbsp) plus a splash of vinegar if you're avoiding sugar. For a tangier kick, add 1 tbsp mustard to the sauce mix. The cheese? Sharp cheddar melts best, but a mix of cheddar and Monterey Jack gives you that perfect stringy pull. Pre-shredded cheese has anti-caking agents—grate your own for the best melt. The flour is just for thickening—don't skip it, or the sauce will be too runny.
This casserole reheats beautifully—350°F for 20 minutes brings it back to life. Store leftovers in an airtight container for 4-5 days in the fridge, or freeze portions for up to 3 months. I always make a double batch—one for dinner, one for lunches. The cheese gets extra crispy on top when you broil it for 2-3 minutes at the end. Keep the pickles separate until serving so they stay crunchy—no one wants soggy pickles in their casserole!
Why You'll Love This Recipe
- One-Pot Magic: I swear by this recipe when I’m too tired to wash extra dishes. Brown the beef right in the same pan you’ll bake it in—no skillet, no fuss. Just dump everything in, stir, and let the oven do the work.
- Ketchup Upgrade: That tangy ketchup isn’t just for color—it’s the secret to balancing the richness. A splash of it in the rice while it cooks? Instant umami magic. My kids fight over seconds, and I don’t even add cheese.
- Lunchbox Hero: Between us, this is my go-to for meal prep. The flavors get better the next day (yes, really), and it reheats like a dream. Pack it in containers for work or school—no sad, soggy lunches here.
- Budget Win: Ground beef and rice stretch for miles, and you’re not sacrificing taste. I’ve made this for game nights, potlucks, and even a last-minute dinner when the fridge was bare. Solid. Reliable. My secret weapon.
Step-by-step instructions for cheeseburger rice casserole
Here's how to create that perfect blend of savory beef, melty cheese, and tender rice in one comforting dish.
🍳 Step 1: Brown the Ground Beef
Heat a large skillet over medium-high heat and add the 1.5 lb ground beef. Break it apart with a wooden spoon as it cooks, about 5-7 minutes, until it loses its raw color and becomes deep brown. This step develops incredible flavor through the Maillard reaction—don't skip it!
Once the beef is fully cooked, drain most of the fat (leave about 1 tablespoon for flavor) and transfer it to a large bowl. Add the finely diced onion and minced garlic cloves to the same skillet, cooking for 2-3 minutes until softened and fragrant. This aromatic base will infuse the entire casserole with depth.
👨🍳 Step 2: Build the Cheeseburger Flavor Base
Return the cooked beef mixture to the skillet and stir in the 0.5 cup ketchup, 1 tablespoon Worcestershire sauce, 2 tablespoons all-purpose flour, 1.5 teaspoons salt, and 1 teaspoon black pepper. Cook for 2 minutes while stirring constantly to create a thick, flavorful paste. This is where all the burger goodness comes together!
Pour in the 1 cup beef broth and 0.5 cup milk, stirring until smooth. The mixture should thicken slightly as it simmers for 3-4 minutes. If it's too thick, add a splash of water or broth to reach your desired consistency. This sauce will be the foundation of your casserole's rich, creamy texture.
🥘 Step 3: Combine with Rice and Cheese
In a separate large bowl, combine the 2 cups uncooked long-grain white rice with the beef mixture. Stir gently but thoroughly to coat each grain. This ensures every bite will be packed with that cheeseburger flavor. Transfer the mixture to a 9x13-inch greased baking dish and spread it evenly.
Sprinkle the 2 cups shredded cheddar cheese evenly over the top, pressing down gently to help it melt into the rice. The cheese should peek through in spots—this is what makes this dish so irresistibly cheesy! For that final touch, scatter the 0.25 cup chopped pickles on top if you're using them. They add a tangy crunch that cuts through the richness.
🔥 Step 4: Bake Until Golden and Bubbly
Preheat your oven to 375°F and bake the casserole uncovered for 35-40 minutes. You'll know it's ready when the top is golden brown and the edges are bubbling vigorously. The rice should be tender and the cheese should be fully melted and slightly crispy on top.
If you're worried about the top browning too quickly, tent it loosely with aluminum foil after 20 minutes of baking. The key is to let the cheese get that beautiful golden crust while keeping the inside creamy. For extra browning, you can broil for 1-2 minutes at the end, but watch it closely to avoid burning.
⏰ Step 5: Rest and Serve with Confidence
Remove the casserole from the oven and let it rest for 10-15 minutes before serving. This resting time allows the cheese to set slightly and makes it easier to slice cleanly. The casserole will be hot and bubbly—perfect for serving family-style with crusty bread or a simple green salad.
Cut into squares and serve immediately. Each bite should deliver that perfect combination of tender rice, savory beef, melty cheese, and tangy pickles. The flavors will continue to meld as it sits, making this even more delicious the next day when reheated. Pro tip: If it's too thick after resting, loosen it with a splash of milk before serving.
Pro Tips For Making Cheeseburger Rice Casserole
- BROWN THE BEEF FULLY: I learned this the hard way—skipping the full browning step leaves your casserole tasting more like a meatloaf than a burger. Cook the ground beef until it’s crispy in spots (about 5-6 minutes) so every bite has that rich, caramelized flavor.
- SWEAT ONIONS LOW AND SLOW: High heat turns onions into mush, and nobody wants mushy onions in their cheeseburger casserole. Cook them on medium-low for 8-10 minutes until soft and translucent—this builds flavor without burning.
- DON’T SKIP THE RICE SOAK: Dumping dry rice straight into the pot leads to uneven cooking and gummy texture. Rinse the white rice first, then soak it for 10 minutes in cold water—it cooks faster and stays fluffy.
- SAVE TIME WITH A PASTA SAUCE BASE: Instead of mixing ketchup and cheese separately, stir in 1 cup of store-bought marinara or cheeseburger-flavored pasta sauce with the ketchup. It cuts prep by half and adds depth the recipe might miss.
Health benefits of this cheeseburger rice casserole
Protein Powerhouse
This casserole packs a serious protein punch with 1.5 lbs of lean ground beef, delivering about 45 grams of protein per serving. That's nearly half of the recommended daily intake for adults! The beef provides all nine essential amino acids your body needs for muscle repair and immune function. I always
Balanced Carbs
The 2 cups of long-grain white rice provides complex carbohydrates that fuel your body with sustained energy. When combined with the protein and healthy fats from the beef, this creates a balanced meal that keeps you full for hours. I prefer medium-grain rice because it stays firm when baked, preventing that mushy texture some casseroles develop. For a lower-carb option, you could substitute half the rice with cauliflower rice.
Calcium and Vitamin Boost
The 2 cups of sharp cheddar cheese adds more than just flavor—it provides 50% of your daily calcium needs per serving. Calcium supports bone health, muscle function, and even helps regulate blood pressure.
The cheese also contributes vitamin A (for eye health) and vitamin B12 (for energy metabolism). I always opt for freshly grated cheese to avoid anti-caking agents that can make the melt less creamy.
Fiber from Pickles
Those ¼ cup chopped pickles on top aren't just for flavor—they add a surprising amount of fiber to this otherwise indulgent dish. Fiber supports digestion and helps keep you feeling full longer. Pickles also provide vitamin K, which plays a role in blood clotting and bone health.
I like to use dill pickles for their tangy crunch, but bread-and-butter pickles work too if you prefer a milder taste.
Umami Richness
The combination of Worcestershire sauce and ketchup adds deep umami flavor while contributing beneficial compounds. Worcestershire sauce contains natural fermented ingredients that support gut health, while ketchup provides lycopene, an antioxidant that's especially potent when cooked.
The beef broth adds electrolytes like sodium and potassium, which help maintain proper fluid balance in your body. It's these small ingredients that make the dish so satisfying.
Customizable Nutrition
One of the best things about this casserole is how easily you can adjust it to fit dietary needs. For a lighter version, swap half the beef for lean ground turkey or black beans.
You can also reduce the cheese by ½ cup and add steamed broccoli for extra fiber and vitamins. I've even made a vegetarian version using mushroom and lentil crumbles instead of beef—it's surprisingly hearty!
The beauty is that you can keep the same method while tweaking ingredients to match your nutritional goals. 💛
Nutrition facts
Frequently asked questions
Can I make this casserole ahead of time?
This dish actually tastes even better the next day. Assemble it completely (including cheese) and refrigerate uncovered for up to 24 hours before baking. The flavors meld beautifully overnight. For freezing, bake first, then let cool completely, cover tightly, and freeze for up to 3 months. Reheat covered at 350°F for 20-25 minutes until bubbly.
How do I keep the rice from getting mushy?
Use medium-grain white rice and don't overcook it in the oven. The key is baking at 375°F for exactly 35-40 minutes—any longer and the rice will absorb too much moisture. For extra insurance, spread the rice mixture evenly in your baking dish so it cooks uniformly. If it looks dry after baking, add a splash of milk when serving.
What's the best way to add extra veggies?
Mix in 1 cup frozen peas or corn with the rice before baking for easy veggie boost. For heartier additions, try ½ cup diced bell peppers or zucchini sautéed with the onions and garlic. The veggies will soften perfectly during baking. Just avoid watery veggies like tomatoes or cucumbers—they'll make the casserole soggy.
Can I make this without Worcestershire sauce?
Yes! Replace it with 1 tbsp soy sauce or 1 tsp smoked paprika for similar depth. For a tangier flavor, add 1 tbsp mustard or ½ tsp onion powder. The sauce adds umami, but this casserole still works without it—just expect slightly less complexity in flavor.
How do I make it vegetarian?
Swap the beef for 1.5 lbs crumbled tempeh or 2 cups lentils (cooked). Use vegetable broth instead of beef broth and add 1 tsp liquid smoke for that smoky burger flavor. The same baking method works perfectly—just check for doneness at 30 minutes since plant-based proteins cook faster.