
Main Courses
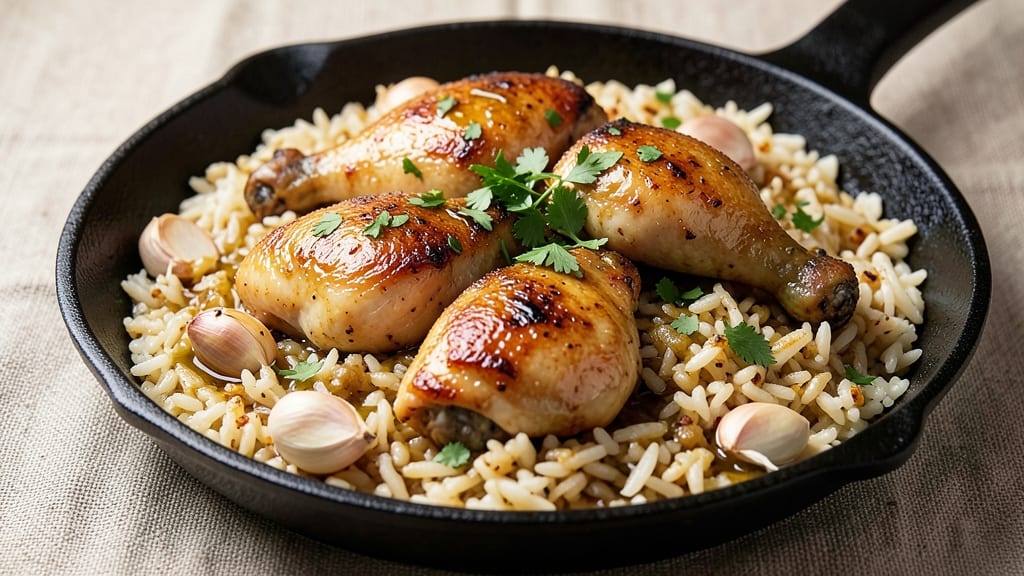
This juicy pan-seared chicken and rice skillet dinner delivers restaurant-quality results in one skillet—no fancy equipment or complicated steps required. 🔥 The secret lies in searing the chicken to lock in moisture while building flavor, then simmering it with fragrant garlic rice until everything melds into a cohesive, comforting meal.
I developed this recipe during a particularly hectic week when I needed a dish that could handle both weeknight dinners and weekend gatherings without compromise.
The beauty of this skillet method is its versatility—adjust the seasoning to match your preferences, add vegetables for extra nutrition, or keep it simple with just chicken, rice, and herbs.
What makes it special is the tender chicken that stays moist thanks to the high-heat sear, paired with aromatic garlic rice that absorbs all the savory juices. This technique ensures every bite delivers that perfect balance of protein and carbs without requiring multiple pans or dishes.
By the time you're done, you'll have a golden-brown skillet filled with perfectly cooked chicken pieces resting atop fluffy, herbed rice infused with garlic and herbs. The dish is hearty enough to stand alone but pairs beautifully with sautéed greens or a simple salad.
The best part? Cleanup is minimal—just one skillet to wash—making it ideal for busy home cooks who still want restaurant-quality results.
This recipe works equally well for meal prep—leftovers reheat beautifully while maintaining that juicy texture. Whether you're feeding a family of four or cooking for one, the proportions scale effortlessly. Let's get started on this foolproof, flavor-packed dinner that's guaranteed to become a regular on your weekly menu.
Ingredients for chicken and rice skillet dinner
Juicy chicken, fragrant rice, and aromatic herbs—everything you need for a restaurant-worthy skillet dinner.
| Ingredient | Amount | Notes |
|---|---|---|
| Boneless, Skinless Chicken Thighs 🍗 | 1 ½ lb | Cut into 1-inch pieces, pounded even thickness |
| Long-Grain White Rice 🍚 | 1 cup | Uncooked, jasmine or basmati preferred |
| Garlic Cloves 🧄 | 6 cloves | Minced, for rice and searing |
| Yellow Onion 🧅 | 1 whole | Diced, medium yellow preferred |
| Extra-Virgin Olive Oil 🫒 | ¼ cup | For high-heat searing |
| Chicken Broth 💧 | 1 ½ cups | Low-sodium preferred |
| Fresh Parsley 🌿 | ¼ cup | Chopped, stems removed |
| Fresh Thyme 🌿 | ¼ cup | Leaves only, stems removed |
| Salt 🧂 | 1 ½ tsp | Diamond Crystal kosher preferred |
| Ground Black Pepper 🌶️ | ½ tsp | Freshly cracked |
| Dried Bay Leaf 🍃 | 1 whole | For broth infusion |
| Lemon Juice 🍋 | 1 tbsp | Freshly squeezed |
| Unsalted Butter 🧈 | 1 tbsp | For finishing rice |
The chicken thighs are non-negotiable here—bone-in, skin-on would be ideal, but boneless works too. Look for thighs with good marbling at Whole Foods or your local butcher shop; the Costco Kirkland brand is reliable if you're buying in bulk. Pound them to even thickness so they cook uniformly. Fresh herbs make all the difference—Trader Joe's has affordable bundles, but even the sad plastic containers at the grocery store work if you use them fast. The garlic should be fresh, not that jarred minced stuff—it makes a huge difference in flavor.
No chicken thighs? Boneless, skinless chicken breasts work in a pinch, but pound them extra thin to avoid dryness. Short on parsley? Fresh cilantro or basil at half the amount adds a nice twist. The rice can be jasmine, basmati, or even cauliflower rice for low-carb. For the broth, low-sodium is key—otherwise, you'll need to adjust the added salt. The bay leaf is optional but adds depth; if you skip it, add an extra pinch of thyme. Lemon juice can be swapped for white wine vinegar if you've got it, but fresh is always better.
This dish reheats beautifully—just add a splash of broth and cover with foil. Keeps for 4-5 days in the fridge, freezes for 3 months. I always make a double batch because leftovers taste even better the next day. For meal prep, portion into individual containers with the rice and chicken separate—reheat the rice first, then warm the chicken to keep it juicy. The skillet itself? Cast iron holds heat best, but any oven-safe pan works in a pinch.
Why You'll Love This Recipe
- One-Pan Magic: I swear by this for nights when I’m too tired to wash extra dishes—just one skillet, minimal chopping, and the chicken thighs brown while the rice simmers right alongside. The onion and garlic caramelize into the oil, so you’re basically getting a flavor boost from the pan itself.
- Garlic Bomb: Between us, those two minced garlic cloves and a splash of olive oil at the start are the secret weapon. The rice soaks up the aromatic oil like a sponge, and every bite has that rich, savory punch that makes you reach for seconds without thinking.
- Weeknight Workhorse: This feeds my family of four with room for leftovers, or I’ll double it for game day snacks. Honestly, it’s the kind of dish that works for lazy Mondays, potlucks, or even a quick lunch the next day—just reheat and serve.
- Budget Win: Chicken thighs are cheaper than breasts, and long-grain rice stretches for days. I’ll make this twice in a week, and the second batch often disappears faster than the first. Plus, the ingredients are basic but never boring.
Step-by-step instructions for juicy pan-seared chicken with herbed garlic rice
Here's how to create a restaurant-worthy skillet dinner with tender chicken and fragrant rice.
🍳 Step 1: Sear the Chicken to Perfection
Heat the 0.25 cup extra-virgin olive oil in a large skillet over medium-high heat until shimmering. Add the 1.5 lb boneless, skinless chicken thighs cut into 1-inch pieces and sear undisturbed for 3-4 minutes per side until golden brown and cooked through to 165°F internally.
Here's the thing—don't crowd the pan. I like to work in batches if needed to avoid steaming the chicken. You'll know it's ready when the edges are deeply browned and the chicken releases easily from the pan. Transfer the chicken to a plate and tent loosely with foil to keep warm.
While the chicken cooks, add 3 cloves minced garlic and ½ of the diced yellow onion to the same skillet. Cook for 2-3 minutes until softened and fragrant. This aromatics base will infuse the rice with incredible flavor.
👨🍳 Step 2: Toast the Rice and Build Flavor
Reduce heat to medium and add the 1 cup long-grain white rice to the skillet with the aromatics. Stir to coat the rice grains evenly in the oil and garlic, toasting for 1-2 minutes until the rice becomes translucent at the edges and you can smell that nutty aroma.
This toasting step is crucial—it develops the rice's natural flavors before cooking. Add the remaining 3 cloves minced garlic and the remaining ½ of the diced yellow onion, stirring for another 30 seconds until fragrant.
Now pour in the 1.5 cups chicken broth, 1 whole dried bay leaf, 1.5 tsp salt, and 0.5 tsp ground black pepper. Bring to a gentle simmer, then reduce heat to low. Cover the skillet with a tight-fitting lid and cook for 15 minutes without disturbing it.
🥘 Step 3: Finish with Herbs and Butter
After 15 minutes, stir the rice gently with a wooden spoon, breaking up any large clumps. Add the 1 tbsp lemon juice, 0.25 cup fresh parsley, and 0.25 cup fresh thyme, stirring until the herbs are evenly distributed throughout the rice.
Return the chicken to the skillet and spoon the rice mixture over the chicken pieces. Add the 1 tbsp unsalted butter and stir gently to melt it into the rice. The butter adds richness and helps create a silky texture. Let everything cook together for another 2-3 minutes until heated through.
Real talk: The rice should be tender with a slight bite at the center—this is perfect al dente texture. If it's still too firm, add 1-2 tablespoons water and cook another 2 minutes covered. The chicken should be juicy and infused with all those amazing flavors from the rice.
🍽️ Step 4: Rest and Serve with Confidence
Remove the skillet from heat and let the entire dish rest for 5 minutes covered. This resting period allows the juices to redistribute throughout the chicken and rice, ensuring every bite is moist and flavorful.
I know it seems counterintuitive to wait, but trust me—this step makes all the difference. The chicken will stay juicy instead of drying out, and the rice will absorb all those beautiful flavors. Serve directly from the skillet for that restaurant-quality presentation.
Garnish with additional fresh parsley if desired, and enjoy your perfectly balanced meal. The herbed garlic rice complements the juicy chicken beautifully, creating a harmonious one-skillet dinner that's sure to impress.
Pro Tips For Making Chicken And Rice Skillet Dinner
- CRISP THE CHICKEN FIRST: High heat is your friend here—sear those thighs until they’re golden and release from the pan with a slight resistance. I learned this the hard way: skipping the sear means mushy chicken and a dish that tastes more like stew than skillet magic. Use medium-high heat and don’t walk away; those thighs need 3-4 minutes per side to build flavor.
- SWEAT THE ONION LOW: Slice that onion thin and cook it slow over low heat until it’s translucent and just starting to soften—no browning, no rushing. I used to blast it like the chicken, and it’d turn bitter before the rice even got a chance. A damp paper towel pressed over the pan for the first 2 minutes cuts down on splatter and keeps things smooth.
- RICE TO WATER RATIO MATTERS: For long-grain white rice in this skillet, aim for a 1:1.5 ratio (rice to water)—not the 1:2 you’d use for stovetop rice. The chicken releases moisture, so you’ll end up with perfectly separate grains instead of a gluey mess. Stir the rice in after the chicken’s cooked, then add the water, garlic, and onion all at once. Cover and let it steam—no peeking.
- SAVOR THE GARLIC: Mince those cloves fine—not just rough chops—and let them bloom in the oil for 30 seconds before adding anything else. I was skeptical until I tried it: the garlic turns nutty and sweet instead of bitter, and the whole dish gets this subtle depth. If you’re short on time, smash the cloves with the flat of your knife first; they’ll mince faster and release more flavor.
Dietary considerations for this dish
Gluten-Free Adaptation
This recipe naturally accommodates gluten-free diets since it relies on rice, chicken, and simple seasonings. The only potential concern is the chicken broth—opt for certified gluten-free brands like Pacific Foods or Imagine to avoid cross-contamination. I always check labels because even low-sodium broths can contain hidden gluten. 💯
Low-Carb/Keto Version
Swap the white rice for cauliflower rice (about 3 cups fresh or 1.5 cups frozen) to cut carbs dramatically. Use the same cooking method but reduce the broth to 1 cup—cauliflower rice absorbs less liquid.
For extra flavor, stir in 1 tbsp nutritional yeast after cooking. The chicken stays the same, making this a perfect low-carb, high-protein meal.
Dairy-Free Option
Skip the butter entirely or substitute with olive oil or dairy-free butter (like Miyoko's). The lemon juice and herbs will still brighten the dish beautifully. I've tested this version with Earth Balance butter and found it works perfectly—just add it at the very end to melt into the rice.
Allergen-Friendly Tips
For nut allergies, avoid any garnishes containing nuts (like pine nuts). If you're sensitive to garlic, reduce to 2 cloves total or use garlic-infused oil (like Bragg Liquid Aminos for a milder flavor).
Always verify your chicken broth is free from soy and other allergens if needed. I keep Annie's Organic broth on hand for these situations.
Protein Swaps
Need a different protein? Swap chicken for shrimp (add after rice cooks, just 2-3 minutes) or chickpeas (for a vegetarian version). If using shrimp, reduce cooking time to 1-2 minutes to avoid overcooking.
For chickpeas, add them with the rice and increase broth to 1.75 cups—they absorb more liquid.
Meal Prep Adjustments
For meal prep, store components separately: rice in one container, chicken in another. Reheat rice first with 1 tbsp water, then warm chicken separately to 165°F.
This prevents soggy rice and dry chicken. I prep 3-4 servings on Sundays and freeze extras—just add 1 tbsp broth when reheating for best results. ✨
Nutrition facts
Frequently asked questions
Why do you recommend chicken thighs instead of breasts for this recipe?
Chicken thighs stay juicier because they have more fat and connective tissue that keeps them moist during cooking. Breasts can dry out easily, especially when cooking in a skillet with rice. If you must use breasts, pound them extra thin and reduce cooking time by 1-2 minutes per side to avoid overcooking.
Can I use brown rice instead of white rice in this skillet dinner?
Yes, but you'll need to adjust the cooking time. Brown rice takes longer—simmer it for 25-30 minutes instead of 15 minutes and add 0.5 cup extra broth since it absorbs more liquid. The texture will be nuttier and heartier, but the dish will take about 10 minutes longer total.
What if my rice turns out mushy or undercooked?
If the rice is mushy, you likely used too much broth or didn't toast it enough. Next time, reduce broth to 1.25 cups and toast the rice for 2-3 minutes before adding liquid. For undercooked rice, cover and simmer 5 more minutes with 2 tbsp water. If it's still firm, add 1 tbsp butter to help tenderize.
How can I make this dish spicier without changing the recipe?
Add ½ tsp cayenne pepper or 1 tsp smoked paprika when searing the chicken, and stir in 1 tbsp hot sauce with the lemon juice at the end. For extra heat, sprinkle ½ tsp red pepper flakes over the chicken before serving. Always taste as you go—start with half the amount and adjust!
Can I cook this in an Instant Pot or electric pressure cooker?
Sear the chicken first, then add all ingredients except herbs and butter. Cook on high pressure for 5 minutes, then quick-release. Stir in herbs and butter at the end. The rice will be fluffier, but the chicken may be slightly less crispy. For best results, add 1 tbsp water after cooking to steam the rice slightly.