
Main Courses
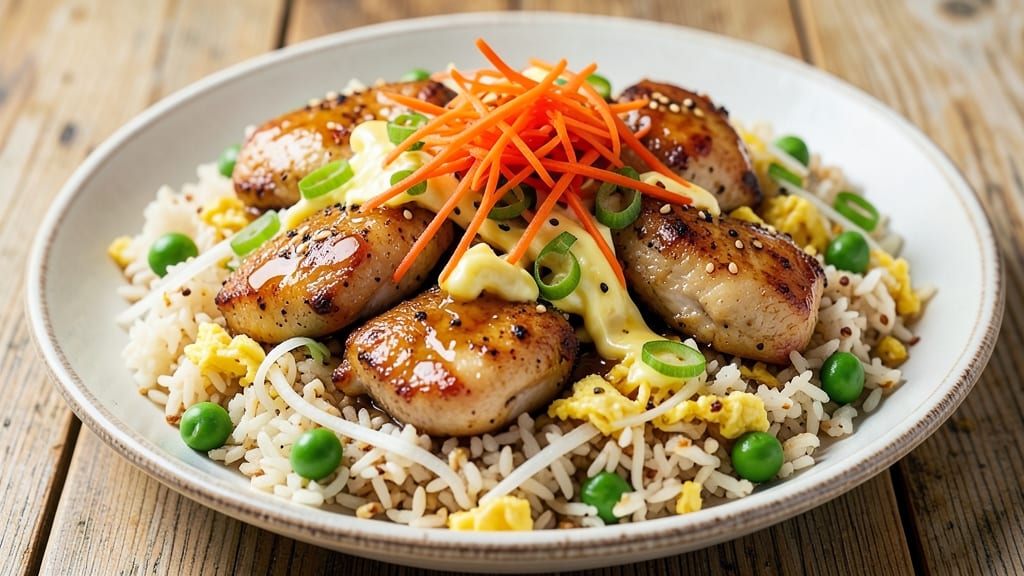
This chicken fried rice meal prep recipe solves the dilemma of healthy lunches without sacrificing flavor or convenience. 💛 I developed it after years of perfecting restaurant-quality fried rice at home—now you can make a week's worth in under an hour.
The secret lies in pre-cooking the protein and rice separately, then combining them with a quick stir-fry that delivers that signature wok-hei crunch even after reheating.
The magic happens in three simple steps: properly cooked day-old rice (never mushy!), high-heat stir-frying to maintain texture, and a soy-ginger sauce that packs bold flavor without overpowering.
I use boneless chicken thighs for juiciness that holds up to reheating, and the veggies stay crisp-tender thanks to a quick blanch before mixing. This isn't your childhood cafeteria fried rice—it's restaurant-quality that tastes fresh even after three days in the fridge.
What you'll end up with is perfectly balanced fried rice with tender chicken, vibrant vegetables, and that signature toasty crunch from the wok. The sauce clings to every grain while keeping the texture dry enough to reheat beautifully.
No soggy rice here—just a meal prep solution that delivers restaurant-quality results with minimal effort.
Store in airtight containers for up to five days or freeze for two months. Reheat gently in a skillet or microwave, adding a splash of water to restore that crispy texture.
Customize with your favorite veggies or proteins—this recipe scales perfectly for meal prep while maintaining that authentic fried rice experience you crave.
Ingredients for chicken fried rice meal prep
Six servings of restaurant-quality fried rice with crispy chicken and vibrant veggies—all ready in 10 minutes.
| Ingredient | Amount | Notes |
|---|---|---|
| Day-Old Cooked White Rice 🍚 | 4 cups | Cold, dry, and separate grains |
| Boneless Chicken Thighs 🍗 | 1 ½ lb | Trimmed, cut into bite-sized pieces |
| Eggs 🥚 | 4 large | Whisked for quick stir-fry |
| Carrots 🥕 | 2 medium | Julienned or thinly sliced |
| Frozen Peas 🌱 | ½ cup | Thawed before mixing |
| Green Onions 🧅 | ½ cup | Thinly sliced, white and green parts |
| Garlic Cloves 🧄 | 4 cloves | Minced, fresh preferred |
| Fresh Ginger 🌿 | 1 tbsp | Grated, finely minced |
| Low-Sodium Soy Sauce 🥢 | ⅓ cup | Kikkoman preferred |
| Sesame Oil 🫒 | 1 tbsp | Toasted, for aroma |
| Vegetable Oil 🫐 | ¼ cup | High smoke point |
| Salt 🧂 | ½ tsp | Adjust to taste |
| Black Pepper 🌶️ | ¼ tsp | Freshly ground |
| White Pepper 🌶️ | ¼ tsp | For classic fried rice color |
| Sesame Seeds 🌾 | 1 tbsp | Toasted, for garnish |
The chicken thighs are your secret weapon here—boneless, skinless, and cut into even pieces. Trader Joe's has the best pre-cut chicken for this, but any grocery store will work. Look for thighs with good marbling—they stay juicier when reheated. The day-old rice is non-negotiable: freshly cooked rice turns mushy when reheated, but 24-hour-old rice has just the right texture. I always cook an extra batch of rice specifically for fried rice—jasmine or basmati both work perfectly. If you're short on time, microwaveable rice pouches (like Tasty Bite) are a lifesaver for meal prep days.
No fresh ginger? Powdered works at half the amount, but fresh is worth the extra minute. Swapping peas for corn or bell peppers? Go for it—just blanch them first to keep that crisp-tender texture. The soy sauce is where flavor happens: Kikkoman or Pearl River Bridge are my go-tos, but any low-sodium brand works. Need a veggie sub? Zucchini or snap peas hold up well when blanched. For extra crunch, add crispy fried shallots at the end—Trader Joe's sells them pre-made if you're lazy like me. The sesame oil is for aroma only—don't cook with it!
This reheats like a dream: 5 minutes in a skillet with a splash of water restores that wok-hei crunch. Store in glass containers with tight lids—keeps for 5 days in the fridge or 2 months frozen. Portion into individual containers before freezing for easy grab-and-go lunches. Garnish with extra green onions and sesame seeds right before eating—that's where the freshness shines. Pro tip: Add a drizzle of sriracha to your container before sealing if you like heat.
Why You'll Love This Recipe
- One-Pan Magic: I swear by this—just toss everything on one skillet after cooking the chicken. No dirty dishes, no stress, and the rice soaks up all the juices while you stir. Honestly, my lazy Sundays thank me every time.
- Craving-Worthy Crunch: That crispy chicken thigh skin? The soft-boiled eggs with runny yolks? The peas popping against the carrots—it’s the kind of combo that makes you forget you’re eating leftovers. (Yes, even on a Tuesday night.)
- Meal Prep MVP: Make a double batch on Sunday, and you’ve got lunch sorted for days. The rice stays firm, the chicken stays juicy, and reheating it just adds to the cozy vibe. My kids grab it straight from the fridge—no complaints.
- Budget Stretch: Chicken thighs are cheaper than breasts, frozen peas are a pantry staple, and day-old rice? That’s just smart. I feed my family four meals for the price of one restaurant dish, and nobody notices I’m saving money. (They’re too busy eating.)
Step-by-step instructions for fridge-friendly chicken fried rice
Here's how to transform simple ingredients into restaurant-quality fried rice that stays crispy in your fridge.
🍳 Step 1: Prep and Cook the Chicken
Heat 1 tablespoon sesame oil and 1 tablespoon vegetable oil in a large skillet over medium-high heat until shimmering. Add the 1.5 lb boneless chicken thighs cut into bite-sized pieces, spreading them out in a single layer. Cook undisturbed for 3-4 minutes until golden brown on the bottom.
Flip the chicken and cook another 3-4 minutes until fully cooked through and no longer pink in the center. Remove the chicken from the pan and set aside. Here's the thing—don't overcrowd the pan, or you'll steam the chicken instead of searing it. If needed, work in batches to maintain that perfect golden crust.
👨🍳 Step 2: Stir-Fry Vegetables and Aromatics
In the same skillet, add 2 medium julienned carrots and cook for 2 minutes until they begin to soften. Add the 4 cloves minced garlic and 1 tablespoon fresh ginger, stirring constantly for 30 seconds until fragrant. Don't walk away—garlic burns faster than you think.
Add the 0.5 cup thawed frozen peas and 0.5 cup sliced green onions, stirring for 1 minute until everything is heated through. The peas should pop slightly as they warm up. Remove the vegetable mixture from the skillet and set aside with the chicken. This keeps your workspace organized and prevents overcooking.
🍳 Step 3: Scramble the Eggs
Return the skillet to medium heat and add another 1 tablespoon vegetable oil. Pour in the 4 whisked eggs and let them sit undisturbed for 5-10 seconds until they begin to set at the edges. Here's where it gets fun—gently push the eggs with a spatula from one side to the other, creating soft, silky curds.
Once the eggs are mostly set but still slightly runny in the center, remove them from the skillet and set aside with the chicken and vegetables. The eggs should be creamy, not dry or rubbery. This is the moment that matters: perfectly cooked eggs make all the difference in fried rice.
🥘 Step 4: Combine Everything for the Final Stir-Fry
Add the remaining 1 tablespoon vegetable oil to the skillet and return it to medium-high heat. Add the 4 cups day-old cooked white rice, breaking up any clumps with your spatula. Stir-fry for 2-3 minutes until the rice is heated through and begins to crisp at the edges.
Pour in the 0.33 cup low-sodium soy sauce, 0.5 teaspoon salt, 0.25 teaspoon black pepper, and 0.25 teaspoon white pepper. Add the chicken, vegetables, and eggs back to the skillet. Toss everything together for 1-2 minutes until everything is well-coated and heated through. The rice should be crispy on the outside but tender inside.
🔪 Step 5: Finish and Garnish
Remove the fried rice from heat and transfer it to a serving dish. Drizzle with the remaining 1 tablespoon sesame oil and sprinkle with 1 tablespoon toasted sesame seeds. Taste and adjust seasoning if needed—you can always add a splash more soy sauce if it's not salty enough.
Here's the secret to fridge-friendly fried rice: let it cool completely before storing. Once cooled, divide it into meal prep containers and refrigerate for up to 4 days. When reheating, microwave for 1-2 minutes or stir-fry in a dry pan for 3-4 minutes to restore that crispy texture. Each bite should deliver a perfect balance of tender chicken, silky eggs, crispy rice, and vibrant vegetables.
Pro Tips For Making Chicken Fried Rice Meal Prep
- CRISP THE CHICKEN FIRST: I learned this the hard way—cooking raw chicken thighs in the same pan as the rice makes everything soggy and uneven. Sear them separately in a hot pan with a splash of oil until golden (about 5-6 minutes per side), then slice thinly before adding to the rice. The extra effort keeps the texture perfect for meal prep.
- THAW PEAS IN HOT WATER: Frozen peas straight from the freezer turn to mush when tossed in. Dump them in a bowl of boiling water for 30 seconds, drain, and shock in ice water for 10 seconds—this keeps them bright and crisp. (Yes, even if you’re impatient like me.)
- SCRAMBLE EGGS SEPARATELY: Cooking eggs in the same pan as the rice steals heat and makes them rubbery. Scramble them in a nonstick skillet with a little oil until just set (soft curds), then fold them in at the very end. This keeps them creamy while everything else gets hot.
- USE COLD RICE, NOT WARM: Warm rice from the fridge sticks together like glue. Spread your day-old rice on a tray and refrigerate uncovered for 10 minutes to dry the surface slightly—it’ll stir-fry like a dream. (Your future self will thank you.)
Common mistakes when making great chicken fried rice meal prep
Overcooking the Rice
Using freshly cooked rice is the #1 mistake that turns your fried rice into a mushy disaster. Fresh rice has too much moisture—it steams instead of crisping up. I always use day-old rice (or even better, 2-day-old rice) because the grains separate and absorb flavors better.
Pro tip: Cook an extra batch of rice specifically for fried rice and store it in the fridge. If you're short on time, microwaveable rice pouches (like Tasty Bite) work in a pinch, but they won't have the same texture as properly cooled rice. 💛
Skipping the Egg Scramble
Eggs are the secret binder that keeps your fried rice cohesive and adds that signature silky texture. Skipping them or scrambling them too dry makes the dish feel flat.
I always scramble the eggs separately at medium heat until they're just set but still slightly runny in the center—this creates those perfect creamy curds. Add them back in the final stir-fry so they reheat beautifully.
If you're not a fan of eggs, you can substitute with crumbled tofu or extra chicken, but the texture won't be the same.
Not Using Enough Oil
Fried rice needs oil to create that wok-hei crunch and prevent sticking. I use a total of ¼ cup vegetable oil (plus 1 tablespoon sesame oil for aroma) to ensure every grain gets that crispy exterior.
If you're worried about oil content, use a high-smoke-point oil like avocado or grapeseed oil—they're healthier and won't burn at high heat. Skimping on oil leads to clumpy, dry rice that sticks to the pan. Trust me, a little extra oil makes all the difference in the final texture.
Overcrowding the Pan
This is a classic mistake that steams instead of sears. When stir-frying, give each ingredient space to develop that golden crust. I always work in batches if needed—first the chicken, then the veggies, then the eggs, and finally the rice.
Overcrowding the pan with all ingredients at once drops the temperature and turns your fried rice into a sad, soggy mess. A 12-inch cast iron skillet or wok is ideal for this recipe—it gives you enough surface area to cook everything properly.
If your pan is too small, cook in two batches and combine at the end.
Ignoring the Soy Sauce Ratio
The soy sauce is where the flavor lives, but too much makes your fried rice taste salty and overwhelming. I use ⅓ cup low-sodium soy sauce for this recipe, but always taste as you go. If you're using regular soy sauce, reduce the amount by half. Another mistake?
Adding the soy sauce too early. Pour it in during the final 1-2 minutes of stir-frying so the rice absorbs the flavor without turning mushy. For extra depth, I sometimes add 1 teaspoon oyster sauce or a pinch of white miso paste—both add umami without overpowering.
Reheating Wrong
Microwaving fried rice straight from the fridge is a texture crime. The moisture turns the rice soggy and kills that wok-hei crunch. Instead, I recommend reheating in a dry skillet over medium heat for 3-4 minutes, stirring occasionally.
If it looks dry, add a splash of water or chicken broth to restore moisture. For microwave reheating, cover with a damp paper towel and heat in 30-second intervals, stirring between each. The goal is to restore that crispy exterior while keeping the inside tender.
A little effort here makes all the difference in the final result. ⚡
Nutrition facts
Frequently asked questions
Can I use fresh rice instead of day-old rice?
Fresh rice is a big no-no for fried rice—it's too moist and will turn mushy when reheated. The starch needs time to dry out, which happens naturally after 24 hours in the fridge. Cook an extra batch of rice specifically for fried rice, or use microwaveable rice pouches in a pinch (though texture won't be identical).
What's the best way to reheat this for maximum crunch?
Microwaving kills the texture, so always reheat in a dry skillet over medium heat for 3-4 minutes. Stir occasionally and add a splash of water if it looks dry. For microwave reheating, cover with a damp paper towel and heat in 30-second bursts, stirring between each. The goal is to restore that crispy exterior while keeping the inside tender.
Can I make this vegetarian?
Swap the chicken for extra-firm tofu (pressed and cubed) or mushrooms (shiitake or cremini). For protein, add edamame or crumbled tempeh. Keep the eggs optional if you prefer a completely veggie-based dish. The stir-fry technique remains the same—just adjust cooking times for the protein substitute.
How do I prevent the rice from sticking to the pan?
Use enough oil—¼ cup total—and make sure your pan is hot before adding ingredients. Break up any rice clumps before stir-frying, and work in batches if needed. A 12-inch skillet or wok gives the best surface area. If sticking happens, add a splash more oil and stir vigorously. The key is high heat and constant movement!
Can I freeze this fried rice?
Yes, but freeze it in single portions for best results. Portion into containers, seal tightly, and freeze for up to 2 months. Thaw overnight in the fridge before reheating. The texture holds up well when frozen, though it may lose a tiny bit of crunch. Add a splash of water when reheating to restore moisture.